|
|
The New Microsoft®
Office Outlook 2007
(Updated November 6, 2007)
Outlook 2007 has recently been released, so sooner
or later you are likely to be transitioning to it. When
you do, as a Total Workday Control (TWC) system user, you will need
some advice on how to configure Outlook 2007 for TWC. There are a
few configuration changes to make, and a few new features that
demand explanation. This article will help make the transition to
Outlook 2007 a smooth one for you.
Installing Outlook 2007
Unlike other Office modules, you must first uninstall earlier versions of Outlook before installing the new one. If you are only trying out Outlook and do not want to fully convert over your e-mail system, rather than installing a full version, a better option is to use Microsoft's Office demonstration tool. This tool runs a full copy of Outlook inside your browser using preloaded sample data (it loads a Citrix environment and works best with Internet Explorer). You can do everything other than send and receive mail in this demo (and you can make but not save configuration changes). There is also a nice set of tutorials installed with the demo to help you learn the new features. Here's the link for that: http://office.microsoft.com/en-us/products/HA101687261033.aspx.
I chose a full install of the trial version, rather than the browser demo, because I was ready to commit to the new software. After I uninstalled my old version and installed the new one, I was pleasantly surprised to find that the install routine not only found and captured all my old mail stores and e-mail accounts (and other Outlook data like Tasks, Contacts, Notes, and so on), but it also picked up nearly all of my custom view settings. And it picked up nearly all my ClearContext views as well. There is one major exception to all this which I mention next. Of course I would do a complete backup prior to any major change like this.
The exception to install conversion success is that any TaskPad configurations will not be picked up by the new To-Do Bar. Task data is picked up, just not the TaskPad view settings. These differences are because, under the covers, the To-Do Bar is implemented completely differently than the TaskPad was. So you will need to do the configuration adjustments described below, no matter what. Sorry, no shortcuts. (Note: a TWC version of ClearContext that does install the TWC TaskPad configurations in the To-Do Bar is now available. See my homepage for the link).
Microsoft Office Command "Ribbon"
A discussion of Outlook 2007 would not be complete without mentioning this. The entire suite of products in Office 2007 has been redesigned to use a command "ribbon" instead of the previous menu and toolbar combinations. This is the most discussed change by far in the press. While ribbons take getting used to, I really like them. I think many of us were getting overwhelmed by the long menus and enormous stacks of toolbars being added to Office applications. What ribbons do is organize all the commands that previously resided in those tools into a much more logical user interface. Their graphical nature works better than many of the older toolbars. And even though they take some adjustment at first, I suspect new application users will learn to use application features more quickly than with the older style.
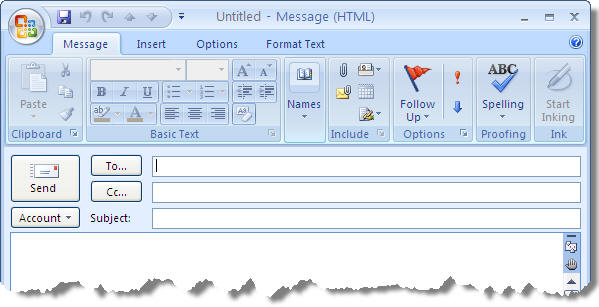
There is a lot of power in these ribbons. They allow you to start with simple controls at the surface, and then step into more complex controls, and they do that very effectively. Below is a sample of the ribbon at the top of a new mail item. Much of it is user configurable.
Oddly, Outlook 2007 does not use the new ribbon in it's main application window, but rather only within the Outlook items themselves (e-mails, tasks, contacts, and so on). In contrast, all other Office 2007 products have made the replacement in the main application window.
That's all I am going to say about command ribbons since the changes there are fairly independent from the TWC system. A little experimentation on your part will lead you through a complete understanding of how they work; they are fairly intuitive. One tip to get you started: the circular Windows logo button in the upper left corner replaces the File menu of the past.
Getting Started with Outlook 2007’s To-Do Bar and Flagged-Mail Tasks
Let’s get you started
on transitioning the TWC methodology to Outlook 2007 by going over
the new task related changes. There are a
few big ones you need to know about.
The first big news on task features with Outlook 2007 is the arrival
of the new To-Do Bar. The To-Do Bar in 2007 is essentially a
replacement to the TaskPad used in previous versions of Outlook. If
you are a TWC system user, then you know that the older TaskPad,
which sits to the right of the appointment calendar, is the key view
for our daily tasks. The new To-Do Bar continues that tradition. But
the new To-Do Bar also introduces some new task behavior compared to
the TaskPad, new behavior I am very excited about.
Probably the most important new behavior is that the To-Do Bar can
be
visible from within any Outlook folder and view. That’s hugely important as it
elevates the stature of tasks in Outlook, something I have felt for
some time needed to be done. Once you open the To-Do Bar in the
various views, it will be there when you come back. You can quickly
arrange to never lose sight of
your important daily tasks, and so you increase the probability of
working them consistently.
The To-Do Bar also adds a fantastic new feature: displaying flagged
mail in the task lists. What this means is that when you click a
flag at the right edge of an e-mail message, a virtual copy of the
mail item is added to your To-Do Bar tasks list. In previous
versions of Outlook clicking a flag added color to the flag on that
mail item, and allowed some optional reminder capability. But it was
not until this version of Outlook that the mail item actually
appeared in
the task list. This enhancement adds a huge new utility as it
provides a very quick way to convert e-mails to “tasks.” Any new
feature that makes that easier I highly applaud.
But before you get too
excited note that these new “tasks” are not equal citizens with true
Outlook tasks, and so for experienced TWC users this new feature
will present a challenge; you will need to figure out how to fit
them into your system. That’s one thing this article intends to help
you with.
I am going to introduce these and more Outlook 2007 tasks changes by
covering seven important topics, listed below. By the way,
this
is a long article, so like a newspaper story, I have placed what I
feel are the most important topics for TWC users at the top. If you
are a reader with limited time, I'd
work from the top of the list on down. Here is the topic list with
links into this article (the links jump into this same page):
-
How to size the To-Do Bar to show more tasks (this may be needed if you have a small screen)
-
How to clean up the To-Do Bar contents resulting from the default install conversion
-
Understanding flagged e-mail and how they are treated in the To-Do Bar, and in the TWC system
-
Changes to Tasks folder and views: the Tasks folder To-Do List
-
Brief coverage of the new tasks display under the daily and weekly calendar
Showing the To-Do Bar
First, let’s talk
about how to reveal the To-Do Bar as this may be a little confusing.
The To-Do Bar has three display states: Normal (fully opened),
Minimized (a narrow vertical bar at right side of Outlook Screen,
and Off (totally hidden). You may choose these states from the main
Outlook View menu as shown below.
![]()
Another way to change the display state once the bar is open is to use the small buttons on the top right of the To-Do Bar. For example, to minimize you can click the small right-pointing chevron in the upper right corner of the To-Do Bar as shown below.
![]()
Once minimized, the To-Do Bar looks like this.
![]()
To
fully open a minimized To-Do Bar, click on the left chevron at the
top of the minimized To-Do Bar; this opens it back up to the Normal
or fully opened state. By the way, in Outlook 2007, this same
minimize behavior is applied to the Navigation Pane (the Navigation
Pane is the folder list that occupies the left side of the Outlook
application window).
Now, to remove the open To-Do Bar completely, click the X next to
the chevron. Closing it like this only removes it from the current
major view by the way.
![]()
Note
however once you’ve clicked that X, there are no buttons you can
click to bring the To-Do Bar back for that major folder view, so to reactivate the To-Do Bar
you’ll need to go to the View menu, choose To-Do Bar, and choose
Normal. Notice these activation and de-activation decisions are
specific for each of the major folder views (Mail, Calendar,
Contacts, Tasks). So if you close the To-Do Bar in the Calendar
folder view, when you navigate to the Mail view it may still be
open. And if the To-Do Bar is closed for all major folder
views, and you want it open for all, you'll need to open it one at a
time for each major folder, using the those View menu commands again
when your reach each major folder.
By the way, there is actually a fourth view state for the To-Do Bar that I call
“popped open.” Let me explain. Normally, when the To-Do Bar is fully
open, it resizes whatever window is to the left of it smaller, to
make room, collapsing the width of columns as needed to keep them
all in view. The figure below an example of this.
![]()
In contrast, the popped open state causes the To-Do Bar to pop open on top of the Inbox without collapsing column widths, actually covering the right columns (see figure below). You achieve this state by clicking in the lower portion of the minimized To-Do Bar, well below the chevron (see the yellow portion in figure below).
![]()
The
resulting To-Do Bar display truly is a temporary popup; if you click
anywhere else in Outlook, this overlaid To-Do Bar will close again.
Why do this? If your screen is a bit small and you periodically want
to take a quick peek at your to-do list, you would use this method.
And this explains why the To-Do Bar seems to disappear sometimes
when you are using it; you probably opened it in the popup mode
without realizing it. This popup behavior is also available on the
Navigation Pane.
Resize the Tasks list to see More Tasks (if needed)
By
now you have noticed that the new To-Do Bar is not a one-to-one
replacement of the older TaskPad. The old TaskPad only included a
tasks list, while the new To-Do Bar also incorporates a new area
that lists upcoming appointments. And on a bit more subtle note, the
monthly mini-calendar row (called the Date Navigator) above the
task list in all versions, is in 2007 now technically part of this
new To-Do Bar construct (in older versions of Outlook that item was
actually separate from the TaskPad). So by default, the task list in
the new To-Do Bar really only occupies about the lower third of the
To-Do Bar (see figure below).
If you have a small screen, the task list portion of the To-Do Bar
may seem too small. The main reason is that the new future
appointments section takes up a fair amount of space on this new
To-Do Bar. If you have limited screen space, you’ll need to decide
if you really want to show this future appointments section.
![]()
If you agree that the Tasks portion seems too short on your screen, the way to remove that appointments section is by right clicking on the To-Do Bar header, and in the context menu that appears, clear the checkmark next to the Appointments item, as shown below.
![]()
Below is how it looks once you do that. Or to make just a little more room, you can simply configure the Appointments section to show fewer upcoming appointments using the Options... item in that same context menu.
![]()
Regarding the size of the To-Do Bar, there is one other new feature compared to the TaskPad. By default, the task list in the To-Do Bar has two modes of view depending on how wide you make it. Currently I assume your task list looks something like the figures above; one wide column and two narrow ones, and no column titles. But now try this: drag the left edge of the To-Do Bar to the left to widen it and see what happens to this column layout. Here’s how mine looks after I widen it.
![]()
See
all the new columns? So what’s happened here? By default, the task
list is configured to show a new Compact mode when the width is less
than 80 characters, and that’s what you see out of the box. Once you
drag it wider, the actual column configuration is displayed. So what
you are seeing while it is narrower is a special simplified compact
configuration. It is an abbreviated view that only shows task
subject, category color, and flag. Try dragging the left edge of the
To-Do Bar to the left and right to see this reconfiguration happen.
For the average new task user, I think this compact view is a nice
design. And in the next edition of the book (out sometime in 2008) I’ll show some very
useful ways TWC users can take advantage of it. But for existing TWC
users incorporating our standard TaskPad formatting, we are going to
need to turn it off. So rather than spend any time discussing the
features of the compact mode, as our first configuration step we’re
going to change the configuration so you never see that mode again,
but rather only see the full configuration columns (which we will
then edit down a bit).
Cleaning up Flagged Mail Tasks after Installing Outlook 2007
As
described above, adding a flag to a mail item in Outlook 2007
creates a task-like entry in the task list portion of the To-Do Bar.
A somewhat unfortunate side effect of this is that if
you have used flags on mail in the past, then during the install of
Outlook 2007, all your old flagged
mail imported into Outlook 2007 will now be listed in
your To-Do Bar. This is true even if the mail is stored away in archive
folders. During install, Outlook 2007 assumes that since they are
flagged they should be displayed in your task list, just like any
new flagged mail. But this is probably not something you intended
to happen given how old these items are, and if you have a lot of
them it can make the task portion of the To-Do Bar almost unusable. So you will want to clean
this up.
It is best to do this cleanup before you configure the To-Do Bar for the TWC settings. That's because the clean-up steps rely on the compact mode that we will hide in the TWC settings below. So do this now.
Here are the cleanup steps:
-
Make sure your To-Do Bar is in the compact mode described above.
-
Click (left-click) the top (header) of the tasks list within the To-Do Bar.
-
In the context menu that opens, select Type (fifth item down). This re-sorts the list, separating all the flagged mail tasks together.
-
Click the top of the tasks list again and in that same context menu that opens make sure Show In Groups is checked as well so that the items group on the Type field.
-
Back at the task list, if the term Messages on Top is not visible in the top right corner of the tasks list in the To-Do Bar, (it may say Posts on Top) then click once there to display Messages on Top
These steps group all your old flagged mail converted to tasks to the top of the task list, in its own group with the title: Message. Anything in the Message group is a flagged mail task. Here is how that looks.
![]()
Try collapsing that group by clicking the minus symbol, and you will see the Tasks group below it. Clearly these message based tasks in the Message group are not true tasks. In fact, if you double-click any of these items, an e-mail window will open as opposed to a task window... you are looking at a virtual copy of the original e-mail. And to clear these out of the To-Do Bar don't simply delete these because you will delete the corresponding e-mails.
6. Now shift-select all these items in that Message group in the task list (but, obviously, leave unselected any new flagged tasks you may have created on purpose earlier), then right-click the flag column on any one of them, and then choose Clear Flag/Delete Task from the context menu.
That will clear out your old unwanted flagged mail tasks from the To-Do Bar, but will retain the original e-mail. Some cautions: do not simply delete these items using the delete key, since that will delete the corresponding e-mails. And do not select any of the true tasks during step 6, as those really will be deleted. And finally, remember, if you have been purposely creating flagged mail tasks for a while in 2007 before reading this article, do not clear those out.
Configuring the To-Do Bar for
the TWC system
Make sure you have
done the step above (cleaned up converted flagged mail) before
proceeding with these steps.
As mentioned above, the first step of configuration is to remove the compact mode of the To-Do Bar. To do this, right-click the header above the task list portion of the To-Do Bar, and from the context menu choose Custom… (or it might say Customize Current View… depending on how wide you dragged the To-Do Bar). You’ll see the following familiar dialog box.
![]()
Click the Other Settings… button. You’ll see this dialog.
![]()
Down at the bottom of the Other Settings dialog, note the checkbox labeled Use Compact Layout in Widths Smaller Than 80 Characters. Clear that checkbox, and leave the revealed setting called Always Use Single-Line Layout selected, as shown below.
![]()
Now when you click OK and OK again, you’ll see a To-Do Bar that, no matter how narrow you drag it, displays all the current column settings.
![]()
These columns are of course not right for TWC, so at this point, to complete the To-Do Bar settings, follow the Configure the TaskPad steps starting on page 67 of the book. Work those as-is until you get to section C step 2 on page 69. At that point you are going to see the conditions in the figure below. These are new compared to the book settings, and be sure to retain both of those conditions; they prevent a strange behavior in Outlook 2007 task displays with old flagged mail marked as Flag Complete.
![]()
Now
proceed with step 3 in the book on that same page (page 67), all the way
through to section E, step 5 on page 72, and then click Add to List
and click OK. But don’t close the Customize View dialog yet, because
there is one last thing to do that is not in the book, as follows.
In my November 2006 newsletter I described a new setting not in the
book that should be added in all versions. Namely, it is to group
the TaskPad (and now To-Do Bar) on the Priority field. So be sure to
do that here. Let’s repeat those instructions here: click the Group
By… button in the Customize View dialog, and in the Group By dialog
that opens, make the settings at the top as shown below. You may
need to clear the checkbox at top as the first step.
![]()
Now you can close the Customize View dialog. Below is how the new To-Do Bar looks. This should look quite close to your TWC configured TaskPad in previous versions of Outlook.
![]()
You can now start using the To-Do Bar for the TWC system just as you used the TaskPad in previous versions of Outlook. By the way, note that using the new Priority groupings, you can drag tasks from one Priority group to another to reprioritize them.
One other change in the new To-Do Bar is that new tasks, when they are created, default to having today's date in the date fields. In older versions date fields of "none" were the default. This is a highly needed change and one I applaud. It makes creating new daily tasks much more smooth. By the way this new default is also true in the Tasks folder. One side effect of this is that if you create new Master Tasks directly in the Master Tasks folder, they are created with dates. So if you use the "Click here to add a task..." row to create a new master task and hit Enter, your task will immediately move out of the Master Tasks view. The lesson is that in Outlook 2007 you probably should create master tasks in that view only by double-clicking in the "Click here to add a task..." row, which opens the task dialog box where you can remove the default dates.
Understanding Flagged E-Mail and How they are Treated in the
To-Do Bar
One of the major changes in Outlook 2007 is the promotion of flagged
mail to near-task status.
Why is this so important? As you know by now, my number one
assertion about how to get control of mail is to convert action mail
to tasks (and then manage them in your tasks system). So anything
that makes this easier is a highly welcome addition. Particularly
since this new feature will lead thousands of people who normally
would never do this to start converting action mail to tasks.
But don’t celebrate yet, because this feature will initially introduce some confusion for experienced TWC system users; enough so that I recommend limiting the use of Flagged-Mail Tasks. Why? Because these flagged items, even though they show up in the To-Do Bar task list, are not true Outlook tasks, and therefore behave differently. For example, once flagged, if you open a Flagged-Mail Task from your To-Do Bar, you won’t see date fields, a priority field, or the reminder field, like you would in a task; it’s still an e-mail. You can find equivalents of those in various places (in the e-mail ribbon menus and the flag context menu), but it is a bit inconvenient compared to a true task window. And other limitations (see list in inset below) have led me to conclude a more limited use of this feature is in order for TWC users. That said, it will play an important role, described next.
Why Flagged-Mail Tasks may not be Right for E-mail Tasks in TWC
Here are the major limitations of using Flagged-Mail Tasks as a comprehensive way of converting action e-mails to tasks for TWC users:
-
As mentioned above, you won’t see date fields, a priority field, or the reminder field when you open a Flagged-Mail Task like you do in a true task; it’s still an e-mail (though you can find equivalents by searching the e-mail ribbon menus and the flag context menu)
-
If you synchronize with hand held devices or other task software, flagged mail will currently not show up in the tasks lists of most of these devices and applications (software updates are likely though to handle this).
-
In the Tasks folders, you need to use a special To-Do List folder to see Flagged-Mail Tasks, and your existing task folder custom views may not be visible in there at first.
-
Recall that my teachings are for you to always change the e-mail’s subject to an action phrase once converted to a task. With Flagged-Mail Tasks, you can change the Flagged Mail Task subject without changing the original e-mail subject, which is good. However you will need to go find the new task in the To-Do Bar, and change it there. In contrast with normal conversions of mail to tasks, the window that opens upon conversion is the right place to change that wording, and right in front of you.
-
You can’t easily edit or add additional text to the flagged mail say for describing thoughts about how to execute the task. There is a way to enable that, but like above, you’ll need to find the new task item, open it, and enable the editing there. Many may feel this is too many steps.
-
A Flagged-Mail Task is a search folder item, so if you delete it, you delete the original e-mail as well. Awareness of that is needed as you handle these items.
My Recommended Use for Flagged-Mail Tasks: Use them for Tagging Deferred
Replies
All is not lost though because there is one very good use for using
Flagged-Mail Tasks in the TWC system: use them to mark e-mail
replies you want to defer for a few hours or days. What I mean by
this is let's say you read an e-mail and realize that to reply
adequately to the e-mail it could take you several minutes of
writing, and that time is not available now. In those cases I
recommend you flag the mail item and come back to it later. (Note:
if the delay is due to you having to do something first, then don't
do this, rather create a true task for that action).
Flagging an e-mail item works quite well for deferred replies since it
is quick, it leaves the e-mail intact as an e-mail, and it is very
easy to reply to. See the inset box below for a complete list of
reasons why this is such a good use for Flagged-Mail Tasks .
Why Flagged-Mail Tasks are Excellent for Tagging Deferred Replies
Here is a complete list of reasons why Flagged-Mail Tasks are especially well suited for deferred reply use:
-
After flagging a mail item, if you move it out of your Inbox, the corresponding task remains in your To-Do Bar. This is quite important because I often find that I am reluctant to empty my day’s worth of mail when I recall mail items are in there that I intend to reply to. Now, after flagging them, I can select all mail in the Inbox and file it, knowing my deferred replies are still neatly displayed and marked in my task list.
-
With default Outlook settings, when you create a Flagged-Mail Task it sets the due date to today for you. That’s exactly what you want since normally you want to reply the same day. And due to our task list configuration, it sorts the item to the top of the Normal section of tasks, nicely underlined.
-
A Flagged-Mail Tasks puts a mail icon on the item in the To-Do Bar list, so you can get in the habit of visually scanning for those first; replies are usually the first thing you should do (after must-do-today tasks), and this makes them easy to spot.
-
You can change the subject line to match the action name, and if you make that edit within the To-Do Bar list (not in the open Flagged-Mail Task window), any later reply to that mail still carries the original subject line with it.
So deferred replies are a great use for Flagged-Mail Tasks and I
encourage you to use them for that. Another good use For
flagged-Mail Tasks is Flagged-on-Send E-mails. This is the topic of
the advanced section in the
February 23 TWC Newsletter which I encourage you to read.
However, limiting Flagged-Mail Tasks to just these uses is only a recommendation. If you can keep the limitations listed above in mind, feel free to start using them more widely. But my heartfelt thoughts on this are why bother dancing around the limitations? It is so easy to convert e-mails to true Outlook tasks you might as well do that and take advantage of the full Outlook task feature set. Still, using these for the above purposes is useful, so the feature is greatly welcomed. And for the millions of Outlook users who have never read my book, this new feature may for the first time encourage them to start converting e-mails to tasks, and that is nothing but a good thing.
Other features of Flagged-Mail Tasks:
-
Upon install of Outlook 2007 and the automatic creation of Flagged-Mail Tasks from your old flagged mail, the category field by default takes the color of the e-mail flag as a category. In fact, categories are much more prominently used in Outlook 2007, with many colored categories added that correspond to flag colors. More on that below.
-
Clicking the flag next to a flagged mail in the Inbox will mark it complete (and remove the corresponding Flagged-Mail Task from the To-Do Bar). Clicking the Complete box in our To-Do Bar task list view does the same thing.
-
Right-clicking the flag itself reveals a number of added things you can do while creating a Flagged-Mail Task, mostly around setting various dates. However avoid the "This Week" and "Next Week" choices on that list as they do not work well with the current TWC configuration of using the Due Date field as the main sort field.
-
You can set the start, end date, and reminder date of a Flagged-Mail Task by opening the item, choosing Follow Up from the menu ribbon at the top of the mail item, and then choosing Custom… from the pull down menu.
-
It's not just flagged mail that gets shown in the To-Do Bar. If you flag a contact it will pop into your To-Do Bar as well. And with proper linkages, you can see tasks from SharePoint, OneNote, and Project Server.
New to the Tasks Folder: the Mysterious
To-Do List folder
So
far we have been talking exclusively about the new To-Do Bar which
replaced the TaskPad of earlier versions. But remember there is
another way to view and manipulate tasks, and that is using
Outlook's Tasks folder. Let's talk about changes there in
Outlook 2007.
The
Tasks Folder (reached by clicking the Tasks item in the Navigation
Pane) looks the same as in previous Outlook versions and is
used the same way, with one important exception: Flagged-Mail Tasks
are not always shown there. If you start using Flagged-Mail Tasks
and you want to see them in the Tasks Folder, you need to start
using the mysterious To-Do List folder. Why do I call it "mysterious"?
Because its presence in the My Tasks portion of the Navigation Pane
seems out of place; that sub-pane is suppose to list task folders,
but where is this task folder? And why is it there in
addition to the Tasks folder?
Before I answer this, first let me say that if you follow my
recommendation above to only use Flagged-Mail Tasks for delayed
replies, you can ignore the distinction. You should be able to
handle those completely in your To-Do Bar and so visibility of
Flagged-Mail Tasks in the tasks folder is irrelevant. But if you
plan to skip that recommendation and use Flagged-Mail Tasks more
extensively, or you just are curious, let me show you what I am
talking about.
- Navigate to the Tasks folder using the Tasks Banner Button at the bottom of the Navigation Pane (or the tasks icon at the very bottom of the Navigation Pane) then,
- Select the To-Do List folder choice at the top of the Navigation Pane in the My Tasks section (see top of figure below, the item with the red flag on it).
By
clicking that you’ll see your Flagged-Mail Tasks appear in the task list
(along with all your "normal" tasks).
Hopefully you’ve created a few Flagged-Mail Tasks so you can see this.
If not go do that now from the Mail folder, then return to the Tasks
Banner Button view, and view Flagged-Mail Tasks in the Simple List view
sorted by date. Try switching back and forth between the Tasks folder
and the To-Do List folder, within the My Tasks sub-pane, to see how
Flagged-Mail Tasks are shown and not shown.
Okay, so now you know how to show your Flagged-Mail Tasks, but do you
understand why this special To-Do List folder is needed? I sure didn’t
at first. I was confused because this folder is not
really a separate data folder. To confirm that, click on the Folder icon
at the very bottom of the Navigation Pane, and view the entire Outlook
data folder hierarchy. You will see one Tasks folder there, but not the
To-Do List folder (see below).
So what’s going on here? The underlying story is a little complicated but here goes. In order to add Flagged-Mail Tasks to the To-Do Bar, the tasks list there is implemented using Search Folder technology. This means that it is a virtual folder view of items resulting from defined search criteria. Since the task nature of Flagged-Mail Tasks is accomplished virtually this way, Outlook 2007 needs to use a Search Folder approach in the Tasks Folder as well to see those "tasks." So the To-Do List folder in the My Tasks pane is a special folder implemented using Search Folder technology and that's why it does not show up in your folder tree. See my book page 178 for more information on Search Folders. Also see this blog post from Microsoft manager Melissa MacBeth specifically about this To-Do List search folder: http://blogs.msdn.com/melissamacbeth/archive/2006/02/24/538989.aspx.
So why didn't Microsoft just replace the Tasks folder icon with this To-Do List search folder? After all, it shows all the normal tasks too. The answer is this: Search Folders are very limited tools. They do not have all the features of a true folder: you cannot share them, you cannot drag and drop items into them, and you cannot create subfolders in them. So if you want these functionalities in your Tasks folder, you need to use the original task folder (and lose access to the Flagged-Mail Tasks). That's why Microsoft is showing both these folders in the My Tasks pane of the Navigation Pane.
A couple more points on this:
- You can only see the To-Do List folder if you enter the Tasks folder through the Tasks banner button or Tasks icon at the bottom of the Navigation Pane. If you enter by clicking the Tasks folder in the folder tree, the My Task sub pane is not visible and so neither is the To-Do List folder.
- While the To-Do List folder is a Search Folder, it is not a normal Search Folder since it does not show in the Search Folders folder in the Folder List. Rather it is a special Search Folder created by Microsoft just to help us with viewing Flagged-Mail Tasks. It acts like a real folder in many ways by the way. For example, you can define custom views for it. Which brings us to the next topic.
Adding Back Custom Tasks Folder Views that may have Disappeared
During the install of Outlook 2007, your custom Task folder and e-mail views should have been picked up and installed in the new 2007 instance of Outlook. However The To-Do List search folder, while it should show all standard views, may not show your custom ones.
Try
this now. Go look in the list of views available in the Tasks folder
(either by looking in the middle of the Navigation Pane above under
Current View, or by looking in the Advanced toolbar). Do this in the
Tasks folder (not the To-Do List). You should be able to see any custom
views you defined earlier. However once you click on the To-Do List item
in My Tasks your custom task views may disappear from that list. My
Master Tasks view was gone once I clicked on To-Do List. But if I
clicked on Tasks folder item, just below it, it reappeared.
Why is this? Because the To-Do List search folder is, even though
virtual, in many ways just like other folders. One feature of views and
folders is that you cannot see views unless they have either been
created specifically in a given folder, or created available to all
folders. So apparently when I created my Master Tasks view, I had only
assigned it to the current Tasks folder (not to all Task folders) and so
it does not show up even in the virtual To-Do List search folder. Here’s
how I fixed that, and how you can fix it too if needed:
- Select the Tasks folder (not the To-Do List folder) in My Tasks.
- Bring up the Custom View Organizer dialog (I do that by opening the views list in the Advanced toolbar, scroll all the way to the bottom, and pick Define Views… Or you can also do it by navigating through the views menus).
- Within the Custom View Organizer dialog, scroll to and select the view name you want to make available in the To-Do List. In my case that was the Master Tasks view.
- The Copy View dialog opens (see below). Change the name of the view from “Copy of…” to something like Master Tasks. But note you cannot have two views with the same name, so maybe call it Master Tasks 07, or some such thing.
- Here is the key step: select the All Task Folders selection at the bottom of the Copy View dialog as shown below.
- Once you click OK to close this dialog, and then OK again to exit the Custom View Organizer dialog, your Master Tasks view will be visible in the To-Do List search folder.
The new Daily Tasks Lists under the Calendar
View
Microsoft defines “daily tasks” the way we do: tasks with dates. So they have created another place to view such tasks, and that is underneath the calendar column in the Calendar folder view (week and day views only). And the formal name for this task display is in fact “Daily Tasks.” Unfortunately though, this list is not designed very well to support the TWC system's use of daily tasks. But there is still some usefulness here. Let me explain.
![]()
First
of all, here is how this task display works. If you focus on today’s
date (in the figure above, it is Tuesday December 12), the list below
the calendar for that date shows all tasks with a due date of today or
earlier. This is much like our TaskPad/To-Do Bar filter, which does the
same. So you might think this is another way to view your TWC Daily
Tasks. Unfortunately though, this view always sorts the older tasks to
the top of the list (opposite from the TWC system), and that sort order is not configurable, including
no way to sort on priority. So assuming you are allowing ten or fifteen
near-term tasks to move forward from day to day, as I teach in the TWC
system, the least important of those tasks may be at the top of
today’s list in this display, and the most important scrolled off the
bottom. In TWC we want high priority tasks always
at the very top, and the newest tasks just under those. So the
configuration of this new task display makes the today’s list portion of
the new Daily Tasks List not very
useful for TWC users.
However do not give up on this display yet. What is useful to TWC users
is to look at the days after today on the week calendar. There,
you can see tasks that you have delayed to those days. For example in
the figure above I have delayed a task to Friday (by setting the due
date to Friday), and I can see it clearly in this view on that day. I
have always wanted a way to view delayed tasks this way; a way to look
ahead and see what’s coming. You can also drag tasks to various days as
a way to set that defer date. So this view does have some usefulness to
TWC users, as long as you know to ignore the today’s list portion of it.
And by the way,
this display also has a nice feature of showing which tasks you
completed in past days of the week (see Monday in the figure above).
One other thing. While Due Date is the initial filter in this
display for deciding which tasks to show on which days, you can also
set the filter to use Start Date. You select this by right clicking
on the header of the list, as shown below. The same action can be used
to turn off the completed tasks display.
![]()
Unfortunately, these are the only configurations you can make on this display. So again, it is of limited usefulness for TWC system users.
E-mail News: New Emphasis on Categories in 2007
My final discussion on Outlook 2007 is about the few changes to e-mail that affect our system. By far the one you should care most about is that you will now find a major new emphasis on Outlook Categories in this version. This is true in both tasks and e-mail, (as well as appointments and contacts). As you know I am not a fan of using categories on tasks in Outlook, but if you have read my book you know I am a very strong advocate of using Outlook Categories as a core method for filing e-mail by topic. So I am delighted to see this new emphasis on categories in Outlook 2007. If you use categories for filing mail by topic, I think you'll find the enhancements very useful.
Specifically, what are the new category enhancements in Outlook 2007 mail?
First of all, Microsoft has added a Categories column to the default e-mail Messages view in Outlook (see right side of figure below)
![]()
You may recall that adding that column manually was one of the first e-mail configuration recommendations in my book, so Microsoft is catching on. But they've gone even further and added a color coding scheme that associates a color with each category in the category list. This does two things for you. It makes it easier to delineate categories at a glance. On small screens you may even be able to set the column width narrow in the list view and still make sense of the categories. It also make it easier to display multiple category assignments, since a colored square take much less space than written text.
They've also added a quicker way to choose categories. It used to take four steps to assign a category to an e-mail. In Outlook 2007 it now takes only two steps: right click within the category column and then select the category from the in-context menu (see figure below). And it can take as little as one step (just one click) for the default category. More on that in a moment.
![]()
One caveat with using the drop down menu is that it shows only the top 15 categories; if you have more you'll still need to open the Categories dialog and scroll to the other categories. The way to do that is to choose the All Categories... choice at the bottom of the context menu (see figure above). When you do you see a Categories dialog very much like the one in earlier versions of Outlook (see below). But there are some important differences.
![]()
First, the concept of a separate Master Category List is not as apparent. You add categories to this list and they are added to your choice list; no need to go to a second list. I welcome that, as the master category concept of earlier versions was confusing to navigate.
Next, you'll see the emphasis on colors in this dialog as well. Once installed, nearly all categories (whether pre-delivered, or converted from your previous custom categories) have colors assigned to them.
And a number of new categories are created that are purely color based (with names like Red Category, Green Category, and so on). These are the six colors from the Outlook 2003 colored flags and by the way are picked up as categories on Flagged-Mail Tasks that appear from the flags in existing mail when you first install Outlook 2007.
If you start using these new predefined color categories for new assignments, the first time you assign one of them, Outlook will ask you if you want to rename it to something else more meaningful, as shown below.
![]()
In that dialog, note that you can change the color assignment. You can also do that for any category in the main category selection window we looked at above; you click the category and use the Color: drop down mid right to change the color assignment.
I mentioned there are now a few ways to assign categories to mail in your list view. I already mentioned right clicking within the categories column. Note when using the right-click method, if you repeat the process on the same e-mail item, each newly assigned category is additive; it is added next to any existing category rather than overwriting it. So what if you do want to replace it? You need to choose the existing category again from the drop down, which removes it. Then go back and assign the new category. Or just use the All Categories... choice and manipulate the checkboxes in the main category dialog at will.
I also mentioned before that if you single click in the Categories column of an e-mail, a default category is assigned for you. Out of the box mine was set to the new Red Category. I found this confusing at first as I accidentally was setting categories every time I clicked. This default is called the "Quick Click" assignment and can be changed by right clicking any e-mail and choosing Set Quick Click... from the bottom of the context menu which was shown above. This opens the dialog shown below.
![]()
If you have one category you tend to use a lot, this is a nice feature. If like me you do not have a favorite category, you may want to turn Quick Click off. Do this using that same control shown above and choose No Category from the drop down list.
And finally, there are keyboard shortcuts for instantly assigning categories (can be set for up to 10 categories). Note in the figures above how you can set those shortcuts.
New Outlook Search Capability
One more thing. With all this talk of using categories to file e-mails, what if you are like me these days and prefer to use bulk full-text searches rather than filing mail by topic? Well there is good news because Microsoft has added a true fast search engine that makes bulk searching for e-mails within Outlook truly practical. The search box is located just to the right of the folder name, at the top of the folder list display (see the faint Search Inbox label below for one example).
![]()
As you may recall the search engine in older versions of Outlook was almost useless. It was painfully slow, and it could search only one data store at a time. The new one is based on Windows Desktop Search technology, which indexes all data in the background. Because of that, its search results are nearly instantaneous. And you can tell it to search all mail data stores (use the dropdown arrow at right to control this and other options). Overall this is a fantastic improvement. I leave it to you to explore this new feature. By the way, with my Outlook 2007 install I had to install this search capability separately after the first, main install. You may need to do that as well.
Wrapping Up
So I hope you have found the new Outlook 2007 features as useful as I have. The richness of this software keeps getting better and better. As usual, the advanced task management best practices that the TWC system teaches require special configurations in Outlook to achieve. I hope this article has helped you learn how to apply those in Outlook 2007.
© Copyright 2007, Michael Linenberger and New Academy Publishers