- Changes to Outlook
- Contact Prioritization
- Main Toolbar
- Item Toolbar
Changes You Will Notice in Outlook, After Installation
To see all the new features in ClearContext v5.1, see this ClearContext Page. Here is a summary of what you will notice that may be of interest to readers of my book:
Color Coded Inbox (Contact Prioritization)
Your Inbox is now color coded, with e-mail from your most important contacts displayed in red, and sllightly less important ones in green (and the rest uncolored). This is a core ClearContext capability and one of the strong benefits of using this software. See the next tab on this page for details on how to use that and, if you desire, how to turn it off.
Startup Splash Screen
You'll see a Manage-Your-Now! Special Edition ClearContext splash screen every time you start Outlook now. That way you know you have the new MYN version.
New Toolbars
You will see two new toolbars, one in the main Outlook window (the ClearContext Ribbon in Outlook 2010), and one inside your Outlook items (like e-mail, tasks, and so on). See the third and fourth tab of this page for details.
New Folders in Folder List
You will see some new folders under the Inbox.
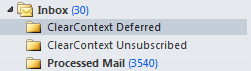
The Processed Mail folder will be there if you install the TWC-MYN Special Edition. It's use is extensively documented in Lesson 5 of my Outlook book (2nd Ed.). The other two folders work behind the scenes. If you use ClearContext multi-folder approach, additional folders may appear here, one for each project name; that location is settable by the way as explained here.
ClearContext Menu
In Outlook 2007 and earlier, a new menu is added to the main Outlook menu bar called ClearContext. Once opened, here is what you will see:
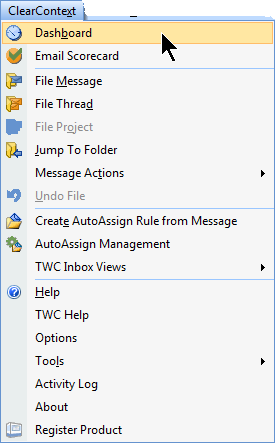
Nearly all the items on this menu are also found as icons on the toolbars, and those icons are what I usually use when I need the corresponding tool.
In Outlook 2010 you will not see this menu. Instead you will see this Ribbon tab (below) which combines the roles of the ClearContext toolbar and menu from previous versions of Outlook:

I'll describe most of the buttons and commands ahead, in the toolbar tabs. Beyond that, there are a few unique items on this menu of immediate interest to you:
TWC Inbox Views
This menu (only active when you have the Inbox open) allows you to change to various TWC-MYN specific Inbox views.
Options
Look near the bottom of the menu, and you will see an Options entry. This is where all the configuration and preference controls are. There is a lot there. You'll enter this control when you have specific chores to do. There is no one page that documents the Options dialog, rather, you will need to explore the ClearContext User Guide to find all the ways to use the Options settings, via each of the functional areas in that guide. I'll link into some specific settings in other pages of this guide.
Help and TWC Help
Notice near the bottom the TWC Help entry. That jumps you back to the custom MYN-ClearContext help pages, like this one. The regular Help entry above that goes directly to the ClearContext Corp. site.
Project Assignments
ClearContext v5 has a new focus on Projects. In previous versions these were called Topics--they are the way to tag mail, tasks, and appointments. Clearly, the ClearContext philosophy is moving toward an action focus.
Unlike the retired Topics approach which had it's own custom column in the Inbox list view, Project assignments are now displayed in the Categories column. This makes grouping mail in the Inbox or Processed Mail folder by project quite easy: just click on the Category column and you can group together all associated mail.
In v5.1, you can now file project-assigned mail into the Processed Mail folder or into individual Project folders, using built in ClearContext tools, and one way to access them is on the menu shown above (see the File Items near the top). For a lot more discussion on filing in ClearContext, see this page.
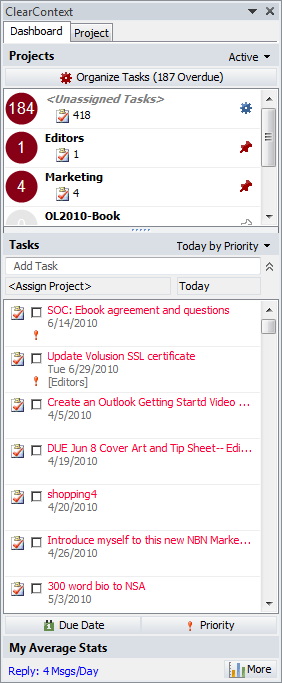
ClearContext SideBar
A new pane in v5.1 is added to the Outlook views that shows tasks and appoinments. The real power of this sidebar is that it allows you to filter them by project--a great new feature that provides needed focus! See full documentation for it here.
The best view for TWC-MYN users with lots of tasks is the Today by Priority (see below)--it groups by Priority with High at the top. Right now, the sorting is oldest first, but later releases will have newest-first sorting, which is more appropriate for TWC users. The real power though is when you use the Project tab and filter tasks on projects, in which case sorting is less important. Again, see the docs here.
Contact Prioritization: The Color-Coded Inbox
What is It?
By now you see the color-coded e-mail in your Inbox, that appeared after installing the software. This is arguably the most useful, non-TWC-MYN feature of the ClearContext software. The red color indicates e-mails from very "important" people, and the green colored mail are from people you know. All other mail is not colored. Obviously, this can be critical in making sure you see and read your most important mail first. This feature is well documented on this page of the ClearContext Corp. User Guide
This two-color approach in v5 is, by the way, a simplified approach compared to previous versions that had many more colors. I much prefer this simplified approach, I find it works very well.
Different Views of Contact Priority
Upon installation of the software, a default version of this color-coding is installed that groups mail in the same date-grouped ways as Outlook did before the installation. But you can choose other priority groupings. The best way to do that is to open the ClearContext menu and select the Inbox Views submenu (2010 users instead should go to the View Ribbon tab and select Change View). Some views selectable there, for example, place all mail from your high-priority contacts at the top of your Inbox. Experiment with the various views in that menu to see if any work well for you. See this link into the ClearContext Corp. User Guide for more information.
Turning Color-Coding Off
Some people do not like the color coding and want to turn it off as quickly as possible. No problem. Using the same view commands described above, choose MYN Messages. This puts your Inbox back to a non-color coded view. Messages by the way is the name of the view that normally ships with the Outlook Inbox, and this pretty much matches that. In 2007 and earlier, you can also select and change these views using the Advanced Toolbar Current View Selector, as described here. However the list there is complicated.
Main Toolbar (2007 and Earlier)
Here is the ClearContext main toolbar for Outlook 2007 or earlier.
You can configure what buttons appear on this toolbar. The default toolbar in the MYN version of ClearContext actually has a few buttons removed compared to the regular version of ClearContext. That said, they can easily be added back in, as I show next.
Adding or Removing Buttons from the ClearContext Toolbar (2007 or earlier)
To add or remove buttons from this toolbar, you do not use the standard MS Office Add or Remove Buttons command. Instead, do this.
- Go to the ClearContext menu, choose Options.
- Click the UI/Toolbar tab.
- Use the Add or Remove buttons to build the button list on the right.
Outlook 2010 ClearContext Ribbon
In 2010, instead of a toolbar (and ClearContext menu) you'll see the ClearContext Ribbon (above). All items are comparable to the toolbar of earlier Outlook versions. You cannot add more ClearContext commands to this Ribbon.
The Main Toolbar/Ribbon Buttons
Task
By far, this will be the main button you will use in the MYN system, either from this toolbar, or from the Item Toolbar inside an e-mail message. This button converts (copies) an e-mail into an Outlook Task. This is a core best practice in the TWC-MYN system, and there is a whole chapter (lesson) on it in the book (2nd Ed.), Lesson 7, so expect to use this button a lot.
The beauty of the ClearContext Task button is that in the Task that it creates it copies both the e-mail text and the e-mail as a file attachment. Out-of-box Outlook cannot do that, and this is a very useful feature; in my opinion it is worth the cost of the software alone.
Configuring how the Task button works
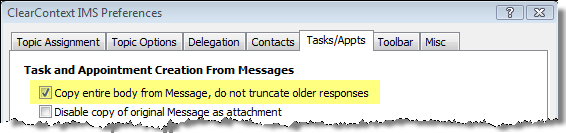
Out of the box, this button does not include all the text of a long message; it truncates the text. This saves storage space and scrolling time when finding the attachment. Some people prefer to have all the e-mail text copied into their task (I do). To change that setting, go to the ClearContext menu, choose Options, click the Tasks/Appts tab. In that tab select the top check box: Copy entire body of Message, do not truncate older responses, as shown below.
Assigning Project Names to Tasks
Also note this: When you create a task using this button, ClearContext gives you a chance to assign a Project name. I encourage you to do this. That way you can view and study all mail and tasks for a given project using the summary dashboard in the new ClearContext Sidebar--this is a great way to manage projects. But also note this: Unlike e-mail, ClearContext does not use the Category field in tasks to store project assignments; rather it uses a special hidden topic field.. So if you want to see project assignments in a list view of tasks you may need to add that custom column to your task view. The link immediately below describes how to do this; it also describes many other features of the Task button (scroll to the section called "Creating Custom Task Views that Include the Project Name" to see how to add a project column).
For a full description of the ClearContext Task button, study the Tasks page of the ClearContext User Guide.
Schedule
Just like the Task button, the Schedule button converts (copies) an e-mail into an Outlook Calendar item. Note that the setting made above for the Tasks button (to include all text from the e-mail or not) also applies to this button. You can assign Project names to calendar items as well and so see sechedule items in your summary dashboard, along with mail and tasks. Again, a great way to manage projects.
File Msg, File Thread, and Assign Topic Buttons
These tools are the primary ways to assign a ClearContext Project to an e-mail. The ClearContext Project filing approach is a parallel universe to the Outlook Categories approach; the latter is discussed (quite completely) in Lesson 8 of the book. See this page in my user guide for a discussion of the two approaches, pros and cons, and how to merge them. And see this page of the ClearContext Corp documentation for a full discussion of Project filing.
Unsubscribe, Do Not Disturb, Dashboard Buttons
These are all good features MYN users will want to use; the ClearContext Corp documentation covers these well:
http://www.clearcontext.com/user_guide/unsubscribe.html
http://www.clearcontext.com/user_guide/do_not_disturb.html
http://www.clearcontext.com/user_guide/dashboard.html
Item Toolbar
This is the ClearContext toolbar that appears within Outlook items like e-mail, tasks, and so on. The appearance of this toolbar depends on whether you have Outlook 2007 or not, and it depends on whether you are working within an e-mail, task, or calendar item.
If you are using Outlook 2007 or 2010, it has the new Ribbon look. Here is how the ClearContext tab of an e-mail or task item looks:

If you are using versions prior to Outlook 2007, there is a comparable toolbar added to the top of Outlook items. And calendar items have a simpler version of this.
The Buttons and Commands Here
Versions prior to v5 had a lot more buttons on this toolbar. Those "missing" commands are now under the More Actions button (see lower-right corner of image above).
These buttons and commands on the inside toolbars also map cleanly to the Main Toolbar, so go to the previous tab of this page to see links into documentation for these.
The advantage of placing these toolbars here inside the Outlook item is that without these you'd need to close the item and select the mail item in the Inbox list before you could use the main toolbar, so having these toolbars inside the item saves time. This is particularly true for the Task button.
Also note that a few commands on these item toolbars are not on the main toolbar, as covered next.
Followup Msg Button
One very important button not on the main toolbar, but under the More Actions button, is the Followup Msg command. A TWC-MYN best practice is to create follow-up tasks for loose-end items you are waiting on. One place many of these come from is when you send a message and expect to be waiting for a reply. This follow-up task will remind you to chase the recipient after a certain length of time. You can create these by hand per pg 136 in the book; however using the ClearContext Followup Msg button gives you a better, one-step way to create these. See pg. 141 for a brief discussion. Also see this link for more on the how the button works.
Mark Important Command
Another command under the More Actions menu here, that is not in the main toolbar, is the Mark Important button. This allows you to change the ClearContext Contact Priority for the sender of this e-mail. This makes their mail stand out morein the Inbox color coding. For more on this, in the link that follows, find and study the section called Manual Priority Adjustment: http://www.clearcontext.com/user_guide/contacts.html