- Download, Install Steps
- Extra Steps Needed
- Uninstalling or Reinstalling
- Changing Project Folder Location
Download and Install Steps, ClearContext V5
The full installation instructions for the base ClearContext IMS product are provided on the ClearContext Corp link below, and those instructions cover most of the MYN installation needs; the list below summarizes those steps, and adds a bit more that is specific to MYN. One important point when using the installation instructions on the ClearContext Corp links: do not use the download links there--that takes you to the non-MYN version. Instead, use the link found in various places on this site including below in step 2.
Below are the five basic install steps.
- If you already have a previous version of ClearContext v5, when you install the new version, the registration key is still retained on your computer. Just download and install the trial version (as in step 2 below) and the key will be picked up.
- All users, close Outlook, then download the MYN install software here. Also if you like, see the ClearContext Corp instructions. Again, do not use the download link there.
- Run the install software, which completes the first phase of the install. This step is very quick. Details of this and the next step are provided in these ClearContext Corp instructions.
- Start Outlook; this starts the second phase of install, which takes a little longer. The software will be analyzing your e-mail usage, and this could be quick or take a while, depending on how much mail you have saved. But it is worth it as it creates an accurate color coding of your e-mail. Do not quit during this analysis step, as you will just need to do it the next time you start Outlook.
- Finally, do the MYN extra steps to complete the MYN install. These are not covered in the instructions linked above. Rather, go to the next tab of this web page to learn and do those steps.
Then go to the Features page to get started with using your new software.
Extra Configuration Steps Needed after Install of V5.1
Confirming the Processed Mail Folder Location
The new single-folder filing capability of v5.1 is fantastic! But you may need to make an adjustment right after install to make it work.
First, as a TWC-MYN user, I assume you want to use the single Processed Mail folder as your main filing location (it's recommended in the book, Lesson 5). And that's good, because the MYN version of ClearContext v 5.1, when installed fresh, comes with the Proccessed Mail folder created and already set this way.
Where is this folder placed? Well, Lesson 5 of the book indicates there are a few potential locations in Outlook that you want to store that folder, but the first suggestion in that chapter is making it a subfolder of the Inbox, and that's what is installed with ClearContext v 5.1.
But note this, if you are upgrading from a previous copy of ClearContext and you had set a root folder there for your ClearContext topic (project) folders (i.e. /Inbox), then single folder filing will file to that folder instead of Processed Mail. And a location like /Inbox does not make sense any more.
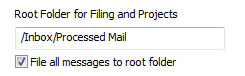
So be sure to go to the ClearContext Options window, the Configuration tab, and confirm the path of the Folder is what you want to use. Most likely it will show what you see below, but set it to whatever location makes sense to you. And if you do not like the name "Processed Mail" as your single folder name, you can change that too.
Again, see Lesson 5 of the book for more discussion of the best place to put that folder.
Also, go to the last tab of this web page to learn more about these settings in ClearContext v5.1.
If you Do Not Want to Use a Single-Folder Approach like the Processed Mail Folder
And if you do not want the single-folder filing approach (say you prefer multiple project-named folders like earlier versions of ClearContext) then clear the checkbox shown above labled File all messages to root folder. You will also want to reset the path of the Root folder in the field above it. Some likely choices are just a slash (/) which puts all project folders in the main mailbox, or /Inbox, which puts all project folders below the Inbox.
Activating the 2002, 2003 TaskPad
On installation, ClearContext reconfigures your TaskPad and To-Do Bar to match the task configurations in my book, but you may need to activate that. Outlook 2007 and 2010 users, as long as you restarted Outlook after install, your MYN To-Do Bar is already activated. But 2002 and 2003 users need to take another step to activate the MYN TaskPad view. Do this as follows:
- Go to the Calendar View.
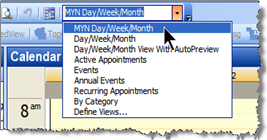
- Once there, in the Advanced toolbar, choose MYN-Day/Week/Month from the view selector (see figure below).
- Then, 2003 users, if the TaskPad is not visible go to the View menu and ensure “TaskPad” is selected.
- If the TaskPad is still not visible, follow the steps below. Also see Lesson 2 in the book (pg 28).
Finding a TaskPad hidden in 2003
If the TaskPad is still not visible after following the above steps, it may be hidden; here are some ways to try to unhide it:
- Try activating the Day view in the Calendar by clicking the word "Day" at the top of the Calendar window. Then try week.
- Make sure you really selected the MYN-Day/Week/Month view in the steps above.
- If all you see is the mini-calendars section on the right side of your Calendar window, then drag the bottom of the mini-calendar section up. You have to grab it just right to do that; look for the cursor to change to a split cursor before you click and drag. That may expose the TaskPad.
- If you see no mini-calendars at all, then click and drag the border just inside the right edge of the Calendar window to the left. That may expose the TaskPad.
- Finally, if still not visible, make sure you are viewing your primary Calendar folder, the one in your main mailbox. The TaskPad is not visible in any secondary Calendar folders you may have created.
Turning Off the Task Reminders Default (in Outlook 2002 and 2003)
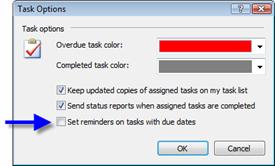
In the TWC Manage-Your-Now! system, Outlook reminders are not recommended for tasks (they are for appointments, just not tasks). If all your new tasks automatically have a reminder set, you need to clear the Outlook setting that makes this default (normally set by default only in 2002 and 2003). Go to the Tools menu, choose Options, Preferences tab, then click the Task Options button. In the dialog that opens (below) clear the third check box down. Page 59 in book.
2010 Users have a different dialog box than that shown above, and a different way to get there, but you should not need to bother with this as that setting is already cleared in Outlook 2010. If you are curious about how to change this though, go to the File tab, then the Options selection on the left, and then the Tasks selection on the left.
Activating the MYN Messages View in the Processed Mail Folder (needed only in Outlook 2002 and 2003)
If you are using the Processed Mail folder as a single-folder filing location (either using Categories or Projects), and if you are using Outlook 2002 or 2003, then you will want to activate the MYN Messages view in that folder. That's because it displays the Categories column, and you'll need it to group mail by category (see Lesson 8 of the book for a full discussion). You could of course add this column manually if you know how, but that's a little harder, so you may as well use the custom view. Outlook 2007 ad 2010 already have that column added, so this view is not needed. To activate that or any other view, you'll use the Advanced Toolbar, as shown next.
Adding and Using the Advanced Toolbar (Oultook 2002, 2003, 2007)
In Outlook 2002, 2003, and 2007, you can access all the new TWC Inbox views by using the ClearContext menu and choosing MYN Inbox Views; those and other views are discussed more here. However all the Tasks folder views, and views in the Processed Mail folder, will be accessed through an optional Outlook toolbar called the Advanced toolbar. You activate this with these steps:
- Open Outlook’s View Menu,
- Choose Toolbars,
- Then select Advanced.
Here is how that will look once added:
(Outlook 2010 has a completely different way to access views which is this: go to the View tab and select the Change Views button at the left edge of the Ribbon.)
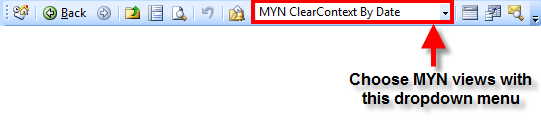
Using the Dropdown View Menu in the Advanced Toolbar (2002, 2003, 2007)
Using the dropdown menu shown above is the main way to choose the non-Inbox TWC-MYN views. If you are in the Inbox, you can use this as well, but you may want to use the "TWC Inbox Views" submenu on the ClearContext main menu; it's a little clearer.
If you are in the Inbox and using the Advanced Toolbar to select views, you'll see three categories of views listed there. The standard Outlook views, the ClearContext views, and the TWC-MYN views, so the list is a bit long. All the special TWC-MYN views start with"MYN" at the front of the view name, and the ClearContext views start with "ClearContext."
The ClearContext views are also accessible through the ClearContext menu, using the Inbox Views submenu; either access point works fine (the menu is a little clearer on what you are getting in each ClearContext view). You may wonder why the non-Inbox TWC-MYN views are not accessible through a menu like that as well; someday they will be, we just didn't have time to do that.
For a full explanation of the MYN views, see the User Guide Views page. Also, you can look the view name up in the index of the book and read more there; however, not all are documented there; for example the TWC Inbox views are only documented in these pages.
Next Steps
Your installation is complete. Now go to the Features page to get started with using your new install. On those pages, I'll show you a few more optional configurations you can make if you wish, and some tips to help you be successful.
Uninstalling or Reinstalling
As with most well designed software, you can uninstall ClearContext using the standard Windows Add or Remove Software tools.
Note: Views are not uninstalled
One thing to note: when you uninstall ClearContext , the custom views (both ClearContext and MYN) remain in Outlook. You can delete them manually if you wish using the view management tools built into Outlook.
If you already have the non-TWC-MYN version of ClearContext
If you already have installed the non-TWC-MYN version of ClearContext, and you want to upgrade to the TWC-MYN version, just install the MYN version on top of it. The license will transfer.
Changing the ClearContext Filing Locations
Introduction
There have been some very significant changes made in ClearContext version 5 around filing mail. This is discussed more at the filing section of this user guide
If you used ClearContext prior to v5, you may recall those versions used proprietary "Topics" as a way to file messages. With version 5, the term "Topic" has been changed to "Project," and the choices for filing locations has been expanded to better support the TWC principles.
Prior to version 5, "filing" in ClearContext meant using only one option: moving the mail into topic-named folders. In fact, when you added a topic name, ClearContext automatically created a folder with that name for you. Anytime you used a File button in ClearContext, the mail was moved into those folders.
This conflicted with the TWC single-folder filing approach (see Lesson 5 of the book Total Workday Control using Microsoft Outlook, 2nd Ed. for more information about my recommended sigle-folder filing approach), and so I instructed my readers to not use the ClearContext File buttons. Instead I recommended they either ignore ClearContext topics altogether, or if they do use them, to use other ClearContext buttons that only assigned the topic tag to the mail, but that did not move the mail into the individual folders.
Limiting use like this was unfortunate as it left many useful filing features of ClearContext unused.
In version 5.1, all this has changed. It is no longer necessary to work around the ClearContext filing system because support for the TWC single-folder filing approach is now built into ClearContext.
To activate the TWC single-folder filing approach, you merely make a simple configuration entry in the ClearContext Otpions window, on the Configurations tab. In fact, if you downloaded the TWC version of the software, that setting is already made for you. If you did not download that version, you can make the setting yourself on that tab. Simply look for the checkbox titled "File all messages to root folder," and select it. (see below).
Once you do, all mail will be filed directly into the "Root Folder" indicated in the field above it. That means if you use the FIle buttons in ClearContext, all selected mail will be moved to the Processed Mail folder. At the same time, the chosen Project name will be inserted into the Outlook Category field (as well as a hidden field in some cases). If you want to see all mail for a given project, you can open the Processed Mail folder, click on the Category column heading, and that will group mail based on Project names. Lesson 8 of my Outlook book describes why that is such a good way to file mail. I also discuss its advantages here.
Using multiple folders. If you do not want to use the single-folder apporach, you can clear that checkbox shown above. You will then get the "normal" behavior of ClearContext, i.e. Project folders will be created within the root location for each new project you create, and when you use the File buttons in ClearContext, the mail will be moved to those separate folders.
So you decide which way you want to file. I encourage you to use the default single-folder filing approach of the TWC version, per Lesson 5 of my book. I think you will like it. And study the filing section of this user guide for more information.