
April 4, 2011 [Updated Dec 7, 2016]
This article extends from my previous blog and shows other ways to limit Outlook’s blue-box e-mail notifications.
Research shows that even small work interruptions can greatly impact workday efficiency. As I discussed in a previous blog entry, those little blue e-mail notification boxes that Outlook puts up for all incoming mail are a big source of interruptions. When these things pop up every 3 to 5 minutes or so—guess what—your productivity is getting hosed. And the efficiency drop can happen even if you do not stop to open the mail item—they are super distracting.
Wouldn’t it be nice if you could limit their appearance to only mail from the most important people (say your boss) and so cut down on their disruption? Well you can; you can adjust Outlook so the blue notification boxes only appear for certain people. But it’s a little tricky—and making that adjustment takes a few steps.
The first step is to turn off the default appearance of the blue-box desktop alert notification for all mail. Do that per the instructions in my previous blog entry (it’s also written up in my book Total Workday Control Using Microsoft Outlook—see Lesson 11).
The second step is to create an Outlook rule to present that same blue-box alert back again, but only when getting mail from certain people. I show you how to do that below for Windows Outlook.
Once you do both those steps you will get those blue boxes only occasionally—you will start to experience a newfound level of focus at work.
Creating an Windows Outlook Rule for Select Blue-Box Notifications
After turning off general notifications you next create the selective notification rule. The steps vary slightly depending on which Windows Outlook version you have. I know this seems like a lot of steps, but you only need to do this once and it covers all your VIPs; later, when you need to edit your VIP list, it’s much easier (see end of article).
- Since you are interested in e-mail that is entering your primary Inbox, you must first select that folder in the Outlook Navigation Pane at the left side of the Outlook window. Note: Exchange users need to be online with your mail server to create these rules. And in Outlook 2010 it saves time in the steps below if you also select, in your Inbox, an e-mail from a person you want notifications from.
- a) Outlook 2003 and 2007 users, from the Tools menu, choose Rules and Alerts.
b) Outlook 2010 and 2013/16 users, on the Home tab choose Rules, then Create Rule. - a) Outlook 2003 and 2007 users, in the dialog box that opens, click the New Rule… button. In the next dialog box that opens, click the second option button, Start from a Blank Rule (in Outlook 2007 just locate that section of the dialog box), and then go to step 4.
b) Outlook 2010/2013/16 users click the Advanced Options… button and then go to step 5. - Outlook 2003 and 2007 users, select Check Messages When They Arrive. Then click Next.
- In the window that opens with the heading Which Condition(s) Do You Want to Check? (as shown below), select the very top item. In Outlook 2007 and 2003 that item will read: From People or Distribution List. But in Outlook 2010/2013/16 it will show the name of the sender of the e-mail you selected; don’t worry if this name is not correct—you can adjust it in the next step.
- In Outlook 2007 and 2003, at the bottom, click the People or Distribution List link; see figure below. In Outlook 2010/2013/16 it will look slightly different—it will list the sender’s name of the last-selected e-mail; if that is the only person you want notification from, you can skip this and step 7 below and go to step 8.
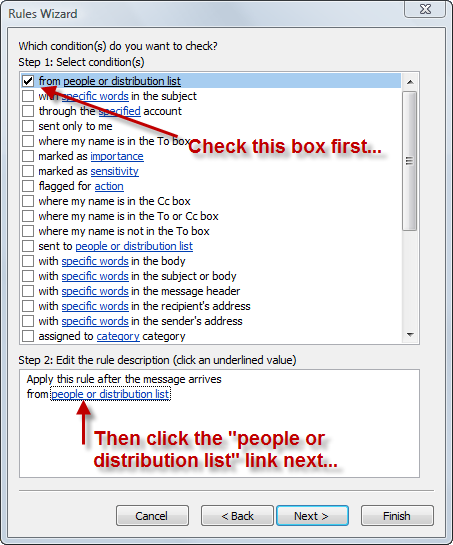
- This is the most important step—here you will choose which people you will want notification from. Click the link in the box at the bottom of the Rules Wizard (in the box labeled Step 2). The link will either be labeled people or distribution list as above, or, in Outlook 2010, it will have a person’s name in there. Once you click it, you will then see a standard Outlook address dialog box open; in there select the people (or distribution lists) you want to get blue-box notifications from. If you are inside a company that uses Exchange, you’ll probably see your company email address list in the scrolling list at the top. Note that as you click each one in the upper portion of the address dialog box, the names are added at the bottom to the right of the From button. Add as many as you want; this is your chance to list all your VIPs (you can edit this list later if you miss someone). If some of your VIPs are not in your company contacts list (or if you are not inside a company), then type their Internet e-mail address in the space to the right of the From button at the bottom; separate each with a semicolon. Then click OK. You’ll then be returned to the Rules Wizard dialog box (the same one shown above) with your VIPs now listed at the bottom.
- Now click the Next> button on that window.
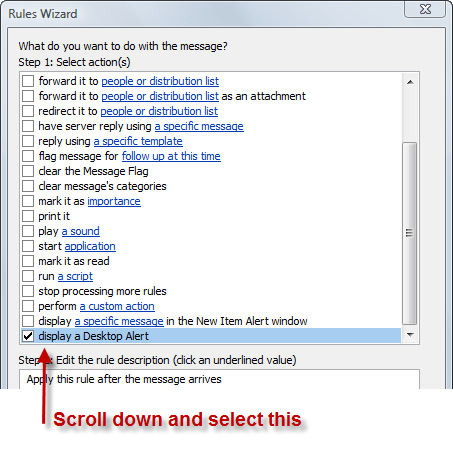
- You will now see the following dialog box. Scroll to the bottom and select Display a Desktop Alert; this is the formal name for the blue notification box.
- Then click the Next> button. You will most likely skip the next dialog box; it has to do with exceptions and it is unlikely you will use it. Click Next>.
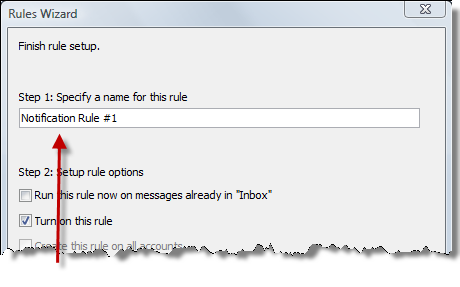
- You will reach the Finish Rule Setup window. There you will see a place to name your rule below the field called Step 1. Insert a name that makes sense to you as shown below. Leave the Turn on This Rule box selected down below it.
- Finally, click the Finish button. In Outlook 2007 and 2003, in the next window (the main Rules and Alerts window, not shown here), be sure to click the OK button (or the new rule will not be saved).
Adding or Removing Names from the Rule Later
Later, after you create the rule, if you decide you want to add or remove names from this alert list, here’s how:
- a) Outlook 2003 and 2007 users, from the Tools menu, choose Rules and Alerts….
b) Outlook 2010/2013/16 users, on the Home tab choose Rules, then Manage Rules & Alerts…. - All versions, in the dialog box that opened, scroll to the rule that you named above and double-click it.
- Click the list of people at the bottom of the Rules Wizard window and then edit the list as instructed in step 7 above. Then click Finish. In Outlook 2007 and 2003, in the next window (the main Rules and Alerts window, not shown here), be sure to click the OK button (or the new rule will not be saved).
That’s it, that’s how to turn the notifications on for only certain senders.
Michael Linenberger
This is awesome! I don’t like those little blue boxes for the hundred-plus emails I get a day, but it *is* nice to know when something from one of the bosses arrives. Thanks!
This is getting a bit more subjective, but I much prefer the Zune Marketplace. The interface is colorful, has more flair, and some cool features like ‘Mixview’ that let you quickly see related albums, songs, or other users related to what you’re listening to. Clicking on one of those will center on that item, and another set of “neighbors” will come into view, allowing you to navigate around exploring by similar artists, songs, or users. Speaking of users, the Zune “Social” is also great fun, letting you find others with shared tastes and becoming friends with them. You then can listen to a playlist created based on an amalgamation of what all your friends are listening to, which is also enjoyable. Those concerned with privacy will be relieved to know you can prevent the public from seeing your personal listening habits if you so choose.
Hmm is anyone else experiencing problems with the pictures on this blog loading? I’m trying to determine if its a problem on my end or if it’s the blog. Any feed-back would be greatly appreciated.
No trouble with the pictures