
Feb 20, 2017
In the edition 5 of my book Total Workday Control Using Microsoft Outlook (due out in late April 2017), I’ve removed the pages about the Master Tasks view from Lesson 12 to make room for other materials. Reason: these days the Master Tasks view is a very low-priority view in MYN. But in case you are still interested in using this view, I’ve posted the text from those pages in this article, so read below if you need this information.
Background
The Master Tasks view is a list-view that uses elements commonly used in other task management methodologies. But the way I have used it has changed over the years of my teaching my MYN system.
In the first edition of my book Total Workday Control Using Microsoft Outlook, the Master Tasks view was a very important part of the system. If you read that edition you may recall that tasks were divided into two types: daily tasks and master tasks. Master tasks represented long-term tasks you were not yet ready to work on (as well as the place to list project and goals). The master tasks concept is common to many task systems and books, including FranklinCovey and the long-famous book The Time Trap, by Alec Mackenzie.
Starting in the second edition of my Outlook book I stopped using master tasks as a storage place for long-term tasks. It’s not that there is no need for long-term tasks; there still is. It’s just that I decided the master tasks list does not work well as a way to manage individual long-term tasks. I discuss why in Lesson 9 of the Outlook book, and discuss there as well why the new Defer-to-Review process solves this problem so well.
But there could still be a place for a master tasks list, and that’s to use it solely to list projects, goals, roles, agendas, and so on. This view enables that. However, this view has a number of disadvantages as well, which I’ll list shortly.
Note: If you followed the first edition but have recently reconfigured your To-Do Bar following Lesson 3 of later editions of the Outlook book (or installed the software MYN Views), you should delete your old Master Tasks view, as it will no longer work with the new To-Do Bar settings. Reason: These new settings no longer filter out tasks with no dates. If you still want to use the master tasks approach, create the new folder and view described next.
Master Tasks View Compared to Category View
You can use this new Master Tasks view as an alternative to the category-based project and goals views described in Lesson 12 of the book. Why might you want to do that? If you like to identify all multistep tasks as projects and so have a long list of projects, this Master Tasks view will work better for you because it will prevent clogging your Outlook Categories list with too many project names. And if you have no need to link individual next-action tasks to higher-level goals or projects, the new Master Tasks folder and view is simpler to use. Or you can use it along with the category-based views.
How This Folder and View Works
Very simply, the way this new master tasks list and view works is this: You list a project as a task entry by placing a task with a P: in front of the name there. Add as many as you like. List goals by placing a G: in front of the task.
And one other very important point: This view is applied in a brand-new Tasks folder. In the old system you shared your current primary Tasks folder for this use, indicating master tasks as tasks with no dates. But no longer; you are now going to create a whole new Tasks folder and call it Master Tasks.
Disadvantages of Using this Folder and View
There are several disadvantages of adopting this master tasks approach. One is you need to modify your To-Do-Bar and To-Do List views so they filter out these entries (as shown in steps ahead). That’s because those lists should only show next actions (Lesson 9). Making the filter change is especially a hassle in the To-Do List because you need to do it for all views you are likely to use there. And if you ever find you must reenter the Lesson 3 settings for the To-Do Bar (sometimes needed due to server changes), you’ll have to remember to put the filter in there.
Because of these many issues, you may not want to use Outlook for your master tasks list, but instead use alternate software (such as Excel or OneNote). That makes sense because you are using very few features of Outlook here—it’s just a simple list. If you do want to do it in Outlook, here’s how:
Create the Master Tasks Folder and View
Note: The view and folder shown here are not included with the optional Outlook add-in called MYN Views. You’ll need to create it with the following steps.
There are three distinct steps to creating the master tasks list. First is to create the folder; next is to create the view; and last is to create filters in other views.
Create the Master Tasks Folder
- Activate the Folder List mode in the Folder Pane. To do that: click the ellipsis at the right end of the data type buttons or labels in the lower-left corner of the Outlook window, and then click Folders (see Lesson 2 for more information).
- Right-click the primary folder group name in your Outlook Folder list (top of the folder group your Inbox currently resides in) and select New Folder. The Create New folder dialog box is displayed.
- In the Name field, type “Master Tasks Folder”.
- From the Folder Contains drop-down list, select Task Items.
- In the Select Where to Place the Folder box, select the name of your main folder group again (as in step 2). Click OK.
- You should now see that new folder appear in your Folder List, as shown here. Again, make sure you activate the complete Folder List view (as described in step 1), or it will not be listed. The new folder should have an Outlook tasks icon (a clipboard with a check mark) next to it. Next you will create the view in that folder.
Create the Master Tasks View
- Click and open the new folder in the folder list so it opens in your main Outlook window. It will of course be empty. From the View tab, click Change View, and then click Manage Views.
- In the upper-right corner, click the New button. Name the view “MYN Master Tasks View”. Choose This Folder, Visible Only to Me. Or if you know you will be sharing it, choose This Folder, Visible to Everyone. Click OK.
- Note: I did not select All Task Folders in step 2. This is because I only want this view applied to this specific tasks folder. It might be confusing if I saw this view in other tasks folders, as it is not applicable.
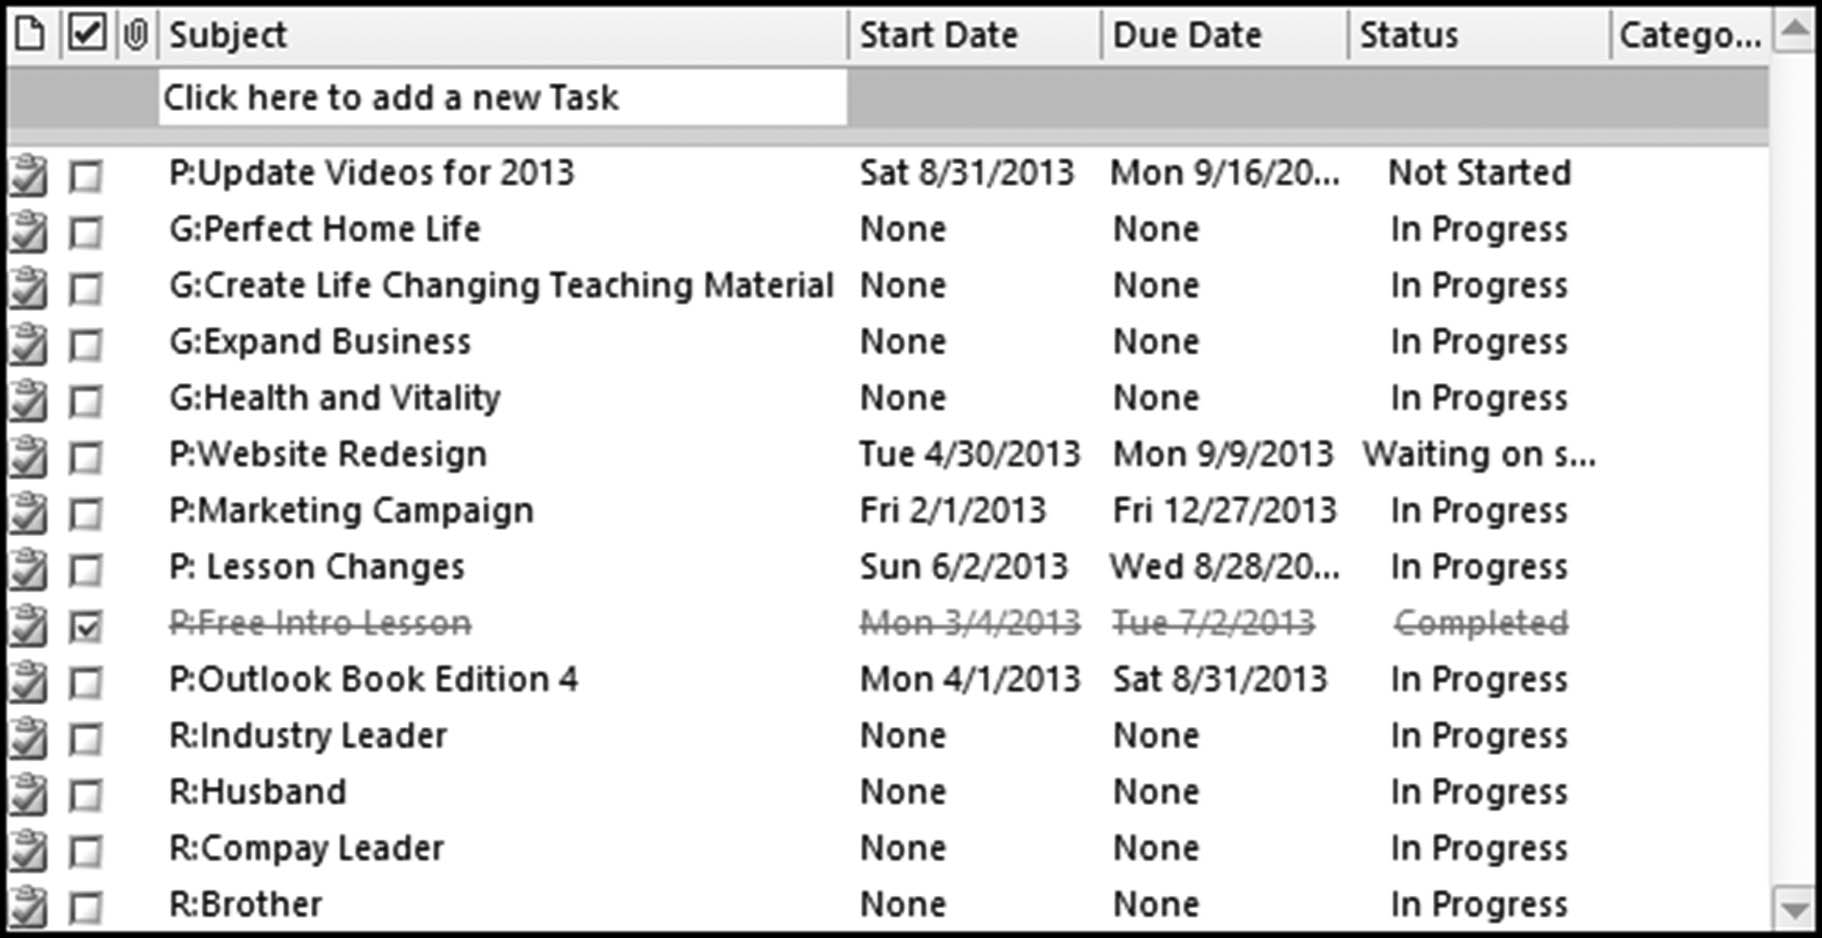
- In the large stack of buttons click the Columns button. Build a field list with the items in the order as shown:
Icon
Complete
Attachment
Subject
Start Date
Due Date
Status
Categories
5. Click OK. Click the Sort button and set sorting to (none).
6. Click OK. Then click Apply View.
Filter Master Tasks Out of the To-Do Bar and To-Do List
The To-Do Bar task list and the To-Do List folder views show tasks from all Outlook folders that hold tasks, so these master tasks will show up there. But you don’t want that. To keep master task entries from appearing there, you will need to add one more filter to the To-Do Bar and to any views you use in the To-Do List folder. Starting with the To-Do Bar:
- Right-click anywhere in the To-Do Bar task list header bar (with the heading Task Subject), and select View Settings. The dialog box with the large stack of buttons opens.
- Click the Filter button. Click the Advanced tab.
- Click the Field button on the left. Select All Task Fields. From the (very long) submenu, select In Folder.
- Select the condition Doesn’t Contain.
- Type the phrase “Master Tasks” (with the quotation marks) in the Value box. Make sure this wording matches exactly the first two words of your new Master Tasks folder name.
- Click Add to List.
- Click OK. Click OK again to return to the To-Do Bar.
- Repeat these steps for any views you use in the To-Do List folder such as the To-Do List view.
Using the Master Tasks Folder and View
In the future, after selecting the Master Tasks folder, you might need to activate this new view. If so, use the methods in the book Lesson 12 section “Choosing Between Optional Task Views.”
This is a very simple view. Use it this way: Place an entry for each project by creating a task for each one and naming the task <P:Project name>; for example, P:Landscape Front Yard. Do that now for all your projects. Use a similar G: notation to list your goals. Open each project and goal and, in the Notes field for each item, list future tasks that someday might become next-action tasks. You might also want to write in the text field a short narrative of the expected outcome of this project and even a short vision statement.
After all your projects and goals are listed, review the complete project list periodically. During that review, be sure to move to your Now Tasks list any next actions that advance each project or goal. I suggest doing that review in your Monday morning Defer-to-Review session (Lesson 9).
Note: Readers of the first edition of this book, if you have created this view because you want to continue your previous practice of storing most lower-priority tasks here, you now have a new process for doing that. In the first edition, you set the date fields of a daily task to None to move it to the Master Tasks view. With this new approach, to convert a Now Task to a master task, you drag the task from your Now Tasks list to this new Master Tasks folder. Drag the other direction to promote a master task to a Now Task. Again, however, I highly recommend using Strategic Deferrals instead (Lesson 9).
Other Points
Notice that the start date, due date, and status fields are optional but useful. They are especially useful for projects. Unlike next actions, all projects could have distinct due dates; and projects might exist at various levels of status. So use these fields in their traditional ways.
I also left off the Priority field because it is less useful in this view, but feel free to add it if you feel you need it. And I do not filter out completed projects or goals. Those I feel you want to admire for a while. You can delete them later. The Categories column is optional. I use it in case I want to show which project category maps to which project in this list. Usually it’s a one-to-one match.
Notice that the sorting was set to None in the configuration steps. This allows you to drag entries into any order you wish, which is useful. Later, you might be tempted to sort by other columns like Due Date or Subject, by clicking at the top of those columns. But after you do that you will lose your ability to drag entries. To get the drag capability back, from the View tab select View Settings, click the Sort button, and reset the sorting to (none).
Also note that in the first edition of this book, I placed very low-priority tasks, tasks that you may or may not ever get to, ideas, whimsies, low-priority interests, all in the Low priority section of the Master Tasks view. I reviewed that section on a very long cycle and often skipped that review. However, after rethinking this, I’ve realized that no matter how low priority a task may seem, you ought to glance at it periodically to see if your interest in it has increased. Each such item can have a different appropriate schedule to review. So these types of tasks are now made part of the Defer-to-Review process, with generally long review periods assigned (at least six months or more), which are determined individually for each item. For more information, see section “Defer-to-Review Tasks” in Lesson 9 in the book.