I am very pleased to announce the guest post below by reader Charles Olsen about Todoist. You may recall that Charles wrote a few guest posts about Things over the last year, and this one is even better!
The Todoist app suite is a set of to-do list management apps that run on virtually all platforms: Windows, Mac, Android, iOS, and the web. It’s one of the most popular to-do list apps out there. Charles Olsen has spent a lot of time and effort developing ways to use 1MTD and MYN within those Todoist apps. Charles’s guest post below shows you how you can do this yourself.
Both Charles and I dismissed Todoist years ago because it lacked key features to allow it to work with MYN. But those features were added recently to Todoist, and a month ago Charles alerted me that there are now excellent ways to use Todoist with MYN (and 1MTD). After reading his article below, I agree!
I am personally excited about Todoist. Mainly because it is completely cross platform. It also can be used with any email system. I use both Windows and Mac, so I am always looking for good apps that support both, and I now think Todoist is it. I’ve started using Todoist as my primary MYN task app, to test the waters, and I am very happy so far. Because of that, I am very seriously considering creating a full MYN video course on it, similar to what I did for Windows Outlook and for the app called Toodledo.
The latter, Toodledo, I’ve pushed for years as the MYN app-of-choice for anyone who does not use Windows desktop Outlook. Can Todoist replace Toodledo in that role? Simple answer: Yes! Granted, Toodledo has many more features, some of which I miss when moving to Todoist. But Todoist is much easier to use and is certainly robust enough. And mainly, it’s much better supported by its developers.
So read the article below. I think you will see that not only is Charles an excellent writer, but the 1MTD and MYN implementations he has come up with are very nicely done! If you like this, give Charles a big “thank you” shout out in the comments section below.
Michael
Todoist: MYN for Everybody
by Charles Olsen
Introduction
I’ve written a couple of articles for this blog about using the Things 3 app for One Minute To-Do List (1MTD) and Master Your Now (MYN), which are productivity systems developed by Michael Linenberger and fully described in his video courses and books.
This article is about how to use these productivity systems in another app, called Todoist. This is another task manager that I’ve played with over the past couple of years, but it could not be configured for MYN.
Until now — a recent update added features needed to do true MYN in Todoist. With this new capability, Todoist is now my favorite app to use with MYN. (I have no affiliation with Doist, the company that created Todoist.)
For those of you who are new to MYN, I’ll start with a brief story about how I learned the power of MYN, and why you may want to use it. Then I’ll talk about using Todoist as your productivity app.
Why MYN?
I learned the value of Michael Linenberger’s “Master Your Now” (MYN) productivity system long before I even discovered Michael or MYN.
I was working for a large company as supervisor of the PC Help Desk. There were almost 1,000 employees in the company, and I had a team of 6 to handle help desk calls and desktop support. Of course we stayed very busy.
The company sent me to a productivity training course. The course lasted all day and was offsite, so that we wouldn’t be distracted by our jobs. Cell phones were not common at this time, and those who had them were instructed to turn them off except during breaks.
The first exercise in the class was to write down the roles we serve in our lives. Everyone has multiple roles: employee, manager, spouse, parent, etc. We spent a few minutes thinking about our lives, and writing down all of the roles we play.
Next, we were instructed to write a long-term goal for each of those roles. Then we were asked to write one or two short-term goals that would move us toward completing each of the long-term goals.
Finally, we were told to examine each short-term goal and write down at least one or two specific actions that would move us forward toward accomplishing that goal.
The exercise was empowering, even fun. The rest of the day we learned various productivity principles, and best practices for using the binder we were given at the start of the day. The class was designed to make us excited and enthusiastic about our new approach to productivity, and it worked. I had created a plan that would change my life, and bring new levels of productivity.
And what happened next?
I went back to work the next day, binder in hand, ready to seize the day. But I found over two dozen new messages in my email Inbox, with people making requests or asking for updates on past requests. My phone’s voice mail had several new messages. Some people had come by my desk looking for me, and had written notes which they left on my desk or my chair.
My carefully-crafted plan had to give way to the urgencies of the day. Not every request that had come in had to be done that day — for that matter, some didn’t actually need to be done at all. Some could simply be forwarded to the help desk issue tracking system, where they should have gone in the first place. But first I had to sift through everything, and figure out what really needed to be done, who needed to do it, and when.
I’m not saying that the exercise we did in class was useless — I think it really is a helpful exercise. But for a productivity system to truly work for you, it must start by acknowledging the urgency of the things you need to do.
Some tasks need to be finished today, or you will face negative consequences. There are many types of consequences in your personal and professional lives. This could range from late fees, to lost business because clients realize they can’t depend on you to complete work they’ve hired you to do on schedule, to disappointing family or friends who were counting on you.
This is why I found Michael Linenberger’s instruction to be transformational. His productivity systems — the One-Minute To-Do List (1MTD), Master Your Now (MYN), and One-Minute Project Manager (1MPM) — all revolve around the urgency of the tasks that you need to complete.
Of course your priorities can change, daily or even hourly. These systems include timely reviews which can be completed quickly — often in one minute, as the names suggest. It’s easy to track changes in priority, and to be confident that you are always aware of — and focusing on — the tasks that truly need your attention right now.
And when you don’t have urgent tasks requiring your immediate attention, you can see the items that are soon going to become urgent, and get started on them.
I’ve studied several productivity systems, taken courses, read books, magazines, blogs, etc. While many of them were helpful, it was MYN that really brought everything together for me.
Set Up Your Todoist Account
To get started in Todoist, you’ll need to create an account on their web site. You can do this on a tablet or phone, but I prefer to do it on a PC (Windows or Mac) with a full-size screen and keyboard.
In your web browser, navigate to
https://todoist.com/r/charles_zfvkav
This is a referral link. Signing up with this link will give you two free months of Todoist Premium, and if you later pay to keep the Premium subscription it will add two months to my account. If you sign up without using an affiliate link, you will create a free, basic Todoist account. The free account may be all that you need.
Click the button labeled Sign up to access Todoist Premium.
You can sign up by connecting to your Google, Facebook, or Apple account, or using your email account and creating a password. Todoist will not ask for a credit card to create your account.
Once you’ve signed up, you’ll be offered a choice of themes. Choose the theme you prefer, and click the Open my Todoist button.
Now that you have created your account you can continue the working in the web browser, or download the app and sign in with the account you just created.
Quick Tour of Todoist
In your new Todoist account, you’ll see the screen is divided into three sections. The bar across the top shows the following items:
- Close/Open menu
- Go to start page (Home)
- Find
- Quick Add Task
- Productivity/Karma
- Question Mark (Help and other support)
- Notifications
- Circle with your initial (Account, Settings, Themes, and more)

Todoist top bar
The column on the left is the Menu, and can be closed and opened by clicking the first icon on the top bar. In a new account, the menu will show:
- Inbox
- Today
- Upcoming
- Projects
- Welcome
- Try Boards
- Labels
- Filters
Projects, Labels and Filters are lists that can be collapsed or expanded as needed. In the initial view, the Project list is expanded and shows two projects, while the others are collapsed.
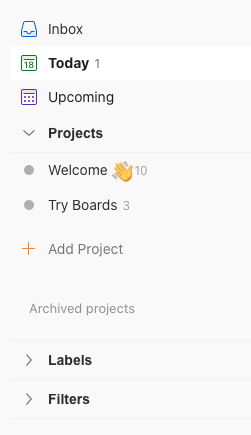
Initial Menu View
New tasks that have not been assigned to a project will sit in the Inbox. If you have unprocessed tasks in the Inbox, it will display a number showing how many tasks are in there.
The Today view shows dated tasks that have not been marked as complete, which are due today or in the past. The Upcoming view starts with Today’s tasks, and continues to show all upcoming tasks. You can scroll through the list, or use the arrows at the top of the view to move forward or back a week at a time.
Projects
You can create your own projects to collect lists of tasks that contribute to a specific goal. A new Todoist account starts with two projects: Welcome and Try Boards. These projects demonstrate some of the features of Todoist, so let’s take a quick look.
Click the Welcome project in the menu on the left, and the tasks in the project will display in the right pane. This project has two sections:
- Welcome! Let’s get started with a few tips
- To go further
You don’t have to use sections in your projects, but they do provide a way to organize your tasks within the project. Both sections in the Welcome project have a few tasks listed.
Click the Try Boards project. This project also has sections, but the view is set to View as board, so the sections are displayed as Kanban boards.
If you’re new to Todoist, it’s a good idea to read through the tasks in these projects as they give you a basic tutorial on how to use the app.
There are four icons at the upper right of the project view, below the top bar.

Project commands
You can click the Comment icon to add comments to a project. This might include a description of the project, key dates, last review date, etc. You can add any number of comments, and Todoist records the date and time of each comment. You can also upload file attachments to comments.
The next icon allows you to share the project to others, so that you can all work on it together. I’ll talk about how to use this later in the article.
The icon with down and up arrows allow you to set custom grouping and sorting for this project view.
Finally, the three-dot icon pulls down a menu of more project actions. I’ll talk about the items that are relevant to setting up our MYN system.
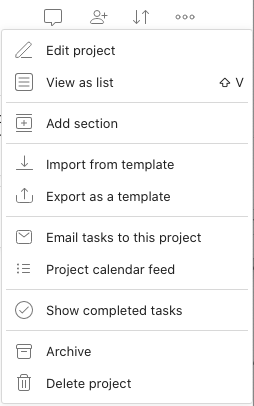
More project actions
Add and Update Tasks
Before we get into the specifics of 1MTD or MYN, it’s important to understand how to enter and edit tasks in Todoist.
The + button in the top bar is the Quick Add Task button, and will open a dialog box to add a new task. When your Todoist window is active (in the app or a web browser), you can also bring up this window by pressing the Q key.

Quick Add Task
You can type or paste the text of the task. Then you can specify a Due Date and the project. If you don’t specify a project it will default to the project you are looking at, or to the Inbox if you have the Inbox, Today, or Upcoming view open.
The four icons at the lower right of the add task window allow you to assign labels, set the priority (P1 to P4, where P1 is the highest), set reminders, and add comments. Depending on how you’re using Todoist, you will be using some of these functions.
In Todoist Preferences on the Shortcuts tab, you can specify a shortcut key to Quick Add Task. As long as the Todoist app is open, you can use this shortcut to add a task even when you’re working in another app.
On an Apple device (Mac or iOS), you can use the Share button to create a task in Todoist from the current web page. There are browser extensions for Chrome, Firefox, and Safari that can add a web page as a task.
To edit an existing task, click or tap the task to open the edit window. Depending on the type of view and the settings for that view, you may be able to reorder tasks by clicking or tapping and dragging them to a new position. (If you have set an automatic sort for that project or view, you will not be able to reorder tasks by dragging them.)
Now that we’ve covered these basics, you’re ready to set up your 1MTD or MYN system. Both systems work quite well in Todoist, but the setup is different so if you’re not going to use 1MTD, you can jump straight to the section on MYN.
One Minute To-Do List (1MTD)
1MTD is literally a “One-Minute To-Do List” — you can get started in about a minute, and it is an excellent solution for managing up to about 100 tasks. (This can be extended a bit past 100, which I’ll explain below.) I’ll describe how to set this up in Todoist, and you can learn more about 1MTD by downloading Michael’s free ebook. (I’ll put a link to the ebook at the end of the article.)
We won’t be using Todoist projects or Due Dates for 1MTD, except that we do need to create one project where we will store all of our tasks. Move the mouse pointer over the Projects list, and a plus sign will appear. Click the plus to create a new project. The Add project window will appear.

Add project
Under Project name, type 1MTD. You can select a color for the project, or leave it on the default color. Click the switch under Favorite to add this project to your Favorites — this will cause the project to display near the top of the menu list.
Under View, leave it set to List. The alternative is to display the project as a Board, which gives you a Kanban type view of the project. You may want to experiment with this once you’re familiar with Todoist, but for now you should use the List view.
Click the Add button to save the new project. It will appear at the bottom of your Project list, and (because you made it a Favorite) on the menu under Upcoming, and above the Projects list.
1MTD Settings
Your Todoist start page will be displayed when you open Todoist, or when you click the Home icon in the top bar. By default, this is the Today list. In 1MTD, we will be working in the 1MTD project rather than the Today list. You can change your start page to be the 1MTD project.
- Click the circle icon with your initial and choose Settings.
- Click General.
- Next to Start page, you’ll see that it is set to Today. Click on the word Today to bring up a list of choices.
- Under Projects, click 1MTD.
- On the right, next to Smart date recognition, click the box and choose No, thanks.
- Scroll down under the Emails section.
- Click the box next to Daily digest and choose No, thanks.
Now when you launch Todoist or click the Home button, it will show your 1MTD project.
Those are the only changes you specifically need to make for these instructions, but you can scroll through the other settings to see if you want to change anything else. These other settings include time zone, date and time format, and what day you want as the start of your week. I set my week to start on Monday, but you can choose whatever day makes sense for your work schedule.
Once you’ve made these changes, click the Close button at the top.
Click the 1MTD project to select it. The name of the project appears on the left, and the four icons appear to the right.
Project name and icons
The first icon allows you to add comments about the project. You can enter a detailed description of the project goals, key dates, last review date, etc. You can also add attachments to comments.
The next icon allows you to add collaborators to this project. Once other people have been brought into the project, you can delegate tasks, and everyone in the project can update and complete tasks. This is particularly helpful when you use Todoist for 1MPM, which I will discuss later.
The icon with the arrows pointing down and up let you specify custom grouping and sorting for this view. We don’t need this for 1MTD, as you will manually move items to show their urgency.
The three-dot icon opens a menu where you can choose to edit the project details, change the view from List to Board, Add sections, import and export templates, email tasks to the project, and more.
1MTD Urgency Zones
In 1MTD, your tasks are arranged in lists depending on when they need to be done: today, within next 10 days, or after the next 10 days. We show this by creating Urgency Zones for storing the tasks.
To create the Urgency Zones in the 1MTD project, click the three-dot icon and choose Add section. A text field will open up with the label Name this section. Click in the text field and type CRITICAL NOW, then click the Add section button. (It doesn’t have to be typed in all caps, that’s just how I like to do it.)
Click the three dots again and add a section named OPPORTUNITY NOW, then once more to create a section called OVER THE HORIZON.
Under each section name is an Add task button. You can use these buttons to add tasks to a specific section on your list. You can also click the Add task button under the 1MTD project title, or click the plus button in the top bar to create a new task. By default, these tasks will be added at the top of the list, where they are not in any urgency zone.
You can also specify the urgency zone for the task as you are typing it. Use the forward slash (/) to specify the section. Here is an example of creating a new task and specifying that I want to add it to the OPPORTUNITY NOW list:
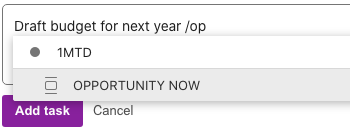
Add task to Opportunity Now section
I typed the task name, then a slash and the letters “op.” This was enough so that “Opportunity Now” was the only matching section. I could then press Enter to select that section, then Enter again to save the task.
You can also drag tasks manually as needed, which you’ll be doing every day as you review your lists. With your 1MTD list set up, follow the standard 1MTD practices. Note that each section displays a number showing how many tasks are there.
Using the Urgency Zones
The CRITICAL NOW list is for tasks that must be done today. There should be no more than five tasks on this list. You should review this list several times each day — every hour is a good practice.
The OPPORTUNITY NOW list is for tasks that are available to work on today, but do not have to be finished today. Some of these tasks may have a hard deadline of tomorrow, or any time in the next ten days. But they are not due today. This list can have up to 20 items, and should be reviewed every day, at the start of your work day.
The OVER THE HORIZON list is for tasks that you don’t need to work on or think about for the next 10 days. You should review this list every week.
You can set the Due Date in a task to remind you of upcoming deadlines. The Due Date will be displayed below the task name.
Another way to track the due date is to type it into the name of the task. For example:
- DUE FRIDAY Submit status report
- DUE JAN 8 Submit draft of article
(By default, Todoist will automatically recognize a date that you type in, and set that as the Due Date of the task. If you followed my instructions above, you turned off that option. I’ve provided a more detailed discussion below in the section titled Automatic Date Recognition.)
As you review the lists, drag the tasks up or down to meet your current plans. In each section, move the tasks into the order that you intend to work on them. If you see a task under OPPORTUNITY NOW or OVER THE HORIZON that must be completed today, move it up into the CRITICAL NOW section.
If you see that a task has become less urgent, you can drag it to a lower spot on the list, or onto a lower-urgency list. If the task is no longer needed, the easiest way to remove it is to mark it Complete by clicking the circle to the left of the task. If you prefer to delete the task, click the three-dot menu to the right of that task and click Delete task.
Additional Urgency Zones
If you need to track more than 100 tasks, you may need to move up to MYN. But if you’re only exceeding the 100 task maximum by a small number of tasks, or only occasionally, you may be able to continue using 1MTD by adding another urgency zone.
It’s likely that the OVER THE HORIZON list is the one that has grown beyond the normal limit, and that it’s becoming difficult to keep up with a full review of the list every week. If this list has grown beyond 75 tasks, you probably don’t need to be reviewing the entire list every week.
You can create another urgency zone for OVER THE HORIZON tasks that you will review once a month, rather than every week. I like to name this section OTH (monthly), and rename the original OVER THE HORIZON to OTH (weekly). With your long-term tasks split up into weekly and monthly reviews, it will be easier and less time-consuming to keep up with your reviews.
Target Now
Another urgency zone I like to add is for OPPORTUNITY NOW tasks that I specifically want to work on today. I don’t have to get them completed today, but they are tasks that I want to focus on after I’ve completed the CRITICAL NOW tasks. These tasks are called Target Now.
If you’d like to use this, create a section named TARGET NOW. It will be added at the bottom of the 1MTD project, so you’ll need to click the handle to the left of the section name and drag it up so that it sits between CRITICAL NOW and OPPORTUNITY NOW. When you have Opportunity Now tasks that you specifically want to target today, drag them into the TARGET NOW section.
Email Tasks to 1MTD
If you have a Premium account, you can email tasks and attachments into Todoist. While you can have new tasks go into the Inbox, you can also email them directly to the 1MTD project.
Click the three-dot icon to open More project actions, then click Email tasks to this project. A window will open with information about adding tasks via email. An email address is generated, and there is a link to copy the address to the clipboard. Click the link to copy the address, then you can add it to your Contacts. When you send an email to that address, it will add a task to this project with the subject of the email as the title of the task, and the body of the email will be added as a comment.
Emailed tasks are added at the top of the project, above the CRITICAL NOW section. Edit the title of the task if needed to specify a clear action, and drag it down to the appropriate urgency section.
Master Your Now (MYN)
MYN expands the 1MTD concept by adding Start Dates to your tasks. Rather than seeing all of your tasks on the list, you will only see those that are relevant today. Tasks that you don’t need to think about yet have a Start Date in the future, and will not appear on your list until you need to act on them. This approach allows you to track any number of tasks without being overwhelmed.
MYN Settings
We’ll start by going over settings that you may find helpful.
- Click the icon with your initial at the top right and choose Settings.
- Click General.
- Start Page should be set to Today. This is the default for a new account, but if you worked through the 1MTD instructions you probably changed it.
- For Smart date recognition, choose Yes, I want Todoist to automatically recognize due dates. Again, this is the default. You may also find this annoying, and prefer to turn this off. I’ll talk about that later in the section titled Automatic Date Recognition.
- Scroll down through the other options and see if there’s anything else you’d like to change. Make sure the Time zone is correct, and that it’s using your preferred formats for Date and Time. You can also set the Start of the week to match your work schedule.
- Under Emails, you can choose to receive various emails from Todoist. Daily Digest will send you an email every morning with tasks that are due. I prefer to turn this off and just work from Todoist, but you may like to receive the email. You can also choose to receive a newsletter about updates, and Tips and Tricks about Todoist.
You can click through the other categories of settings to see other available options. The default options will work well for MYN, so I won’t go through the other settings here.
When you’ve finished updating and reviewing your settings, click the Close button.
Projects
It can be helpful to organize your tasks into projects. This could be as simple as having two projects: Home and Work. You may prefer create projects for specific goals.
I like to start with a project called Routines, where I put all the boring tasks that have to be done but don’t actually contribute to moving my goals forward. This includes bills that need to be paid, and routine maintenance for my house and car.
Then I create projects as needed to store tasks I need to do for my goals. If you don’t need to separate your tasks into projects, you can create a single project called “Tasks,” “To-Do’s,” or perhaps “Reviewed,” to indicate that you have reviewed these items and assigned the desired priority and date. You do need to have at least one project, because new tasks will sit in the Inbox until you have assigned them to a project.
Creating Projects
On a Mac or PC, move the mouse pointer over the Projects list and a plus sign will appear. On a phone or tablet, a plus sign appears at the bottom right of the display when you’re viewing the project list. Click the plus sign to create a new project.
You can further organize tasks by creating sub-projects. For example, you might start by creating two projects for Work and Personal, then add sub-projects under these projects.
Once you’ve created a project, you can click and drag it under the parent project, and to the right to indent it under the parent. Sub-projects can have sub-projects, up to three levels deep.
Start Dates
In MYN, every task has a start date. This is the date when you need to do the task, or at least start thinking about it. Since you only see the tasks you actually need to be aware of right now, you’re not distracted by items that you’ll work on in the future.
Todoist does not have a Start Date field, so we have to use the Due Date field for MYN. For the rest of this article, as I talk about the MYN Start Date or the Todoist Due Date, keep in mind that these are the same thing.
Urgency Zones
MYN prioritizes tasks by when they need to be done. Any tasks that must be completed today are considered CRITICAL NOW. Tasks that are available to work on today but not absolutely due are OPPORTUNITY NOW, and tasks that you don’t need to think about for at least the next 10 days are OVER THE HORIZON.
In Todoist, we indicate the urgency zone by using the Priority field. Todoist has four Priority levels: P1 to P4, where P1 is the highest priority. We’ll use P1 for CRITICAL NOW, P2 for OPPORTUNITY NOW, and P3 for OVER THE HORIZON.
Custom Sorting
To see the tasks in the proper order, you need to set up the sorting in your Today view. At the time I wrote this (December 2020), this feature had not yet been rolled out to all platforms. For example, if you install Todoist on Windows 10 from the Microsoft Store, it can’t do custom sorting. However, if you go to the web page todoist.com/downloads/windows and download the Windows Legacy version under the Desktop section, you can set up a custom sort once you’ve installed it.
Also, you may not be able to set up custom sorting on your iPhone or iPad — but once the sort is set up, you can see it on your iPhone and iPad.
If you don’t have the Sort button in your Todoist app, you can follow these instructions by logging into your account on the Todoist web page.
Click Today in the menu on the left to select it.
In the upper right of the view, below the top bar, there is an icon with arrows pointing down and up. Click the arrows to display a menu of the various sorting options, then click Custom Sort.
- Under Group by, select Priority.
- Under Sort by, select Due date.
- A new field will appear in the list, called Order. Set this to Descending.
- Leave Assigned to set to Anyone, and click the Sort button at the bottom.
With this set, your Today view will show tasks grouped by Priority, so the P1 Critical Now tasks are at the top, then P2, P3, and P4. We’re not using P4, but that is the default so if you forget to set the priority on a task you’ll find it down in the P4 section.
Within each group, tasks dated Today will be at the top. As tasks age, they will move farther down the list. If a task has fallen down the list and you need to show that it is important, you can bring it to the top of that list by changing the Todoist Due Date to Today.
But if a task continues to slide farther and farther down the list, this is a good sign that it’s not really important to you. You can remove it from the list by marking it Complete or deleting it.
Entering Tasks
In Todoist, you can enter a task by clicking the plus sign at the top, or by pressing the Q key. If Todoist is running but you’re working in another app, you can press the Quick Add Task shortcut key to pop up a window where you can enter a task.
To get started, open the the Todoist app and click the plus sign or press Q. The Quick Add Task window will appear, and you can type the task name. If you were in a project list when you started to add this task, it will default to this project. You can change it to a different project by clicking the Select a project button under the task name. (That button will display the name of the current project.)
Start Date
Click the Schedule button to select the date when you want to see this item appear on your list. A calendar window will open with choices at the top for Today, Tomorrow, Next weekend, Next week, and a monthly calendar below these choices. You can click the arrows to scroll through the months if needed. When you hover the mouse pointer over a day in the calendar, Todoist will tell you how many other tasks you already have scheduled for that day.
You can also type the date in the title of the task, in just about any manner that can be recognized as a date. Here are some examples:
- 3/19
- 2/11/21
- apr 14
- today
- tod (sets date to Today)
- tomorrow
- tom (sets date to Tomorrow)
- tue (sets the date to the following Tuesday)
Recurring Tasks
You can also set recurring tasks by including the word “every”:
- every monday
- every 5th
- every 3 months
- every april 15th
Tasks written in that format will repeat on that schedule, regardless of when the last task was checked off. If you want the task to repeat based on the last completion date, write “every” with an exclamation point. For example:
- every! week
- every! 15 days
- every! 3 months
- every! 2 years
Repeating tasks entered in that fashion will start Today. If you want the first occurrence of the task to be a different day, you can type that in as well:
- every week starting 3/14
- every! month starting next friday
Labels
The Add labels button will let you add one or more labels to the task. Labels can be helpful if you use GTD-style contexts. You can add several labels to a task as needed, and can find tasks by searching for the label.
Priority (Urgency Zone)
The next button, with the flag, will set the priority. The default is Priority 4, but all tasks in MYN should have a priority set. Since the task will not appear on your Today list until the start date arrives, think about the urgency of the task on that day. If you will absolutely need to finish the task on that day, it will be Critical Now, and should be set to Priority 1.
If the task does not need to be completed on that day, it will be Opportunity Now and should be set to Priority 2. If you don’t need to work on that task within 10 days of that date, it will be Over the Horizon and should be set to Priority 3.
When you select a date for a P1 task, this is obviously the date that you are going to work on the task — you have to finish it on that date.
Defer-to-Do
For a P2 task, you don’t have to finish on the day that it appears on your Today list. That date could indicate the day you want to work on the task, or the day you want to start thinking about the task. P2 (Opportunity Now) tasks are considered Defer-to-Do — you are deferring the task until the day you intend to do it.
Defer-to-Review
P3 (Over the Horizon) tasks are lower priority, and the date you select indicates when you want to consider the task. These tasks are Defer-to-Review — you defer them to the date that you want to review and consider the task. When it comes up on your Today list, you can decide if the priority has risen and you want to make it an active task by moving it to P2. If it is not relevant yet, but you’re not ready to delete it, you can defer it again by setting a new date in the future.
P3 Defer-to-Review tasks should be set to a Monday, as far in the future as appropriate. Following this process will reduce distraction, as you will only see a few of these tasks each Monday when they appear on the list. At that time you can defer them again to a Monday in the future, change the priority to P2 or P1 to work on them now, or remove them if you’ve decided you will not be working on this task. You can remove a task by deleting it, or (my preferred approach) by clicking the checkbox to mark it as complete.
When I defer a task (of any priority level) I add a comment to note why it is being deferred. For example:
Recovering from illness; deferring this for a month.
Todoist will automatically stamp the comment with the date and time. If you add a comment each time you defer a task, you may see that some tasks have been deferred several times. After a few deferrals, you’ll realize that this task is never going to get done, and you can remove it from your list.
Work As a Team
Todoist allows you to collaborate with others, sharing projects and assigning tasks. This could be co-workers at your company, your spouse or other family members, other people in a volunteer organization, friends preparing for a camping trip, etc. Once you invite someone to a project, you will be able to assign tasks to them and send them comments.
When you share a project, everyone in the project will have full access to all of the information: tasks, comments, and uploaded files. They will be able to add new tasks, assign tasks, complete tasks, add comments, and (if they have a Premium account) upload files.
How to Share a Project
To share a project, click the three-dot menu next to the project name in the list on the left. (You can also right-click on the project name in the list.) The Share options window will appear.
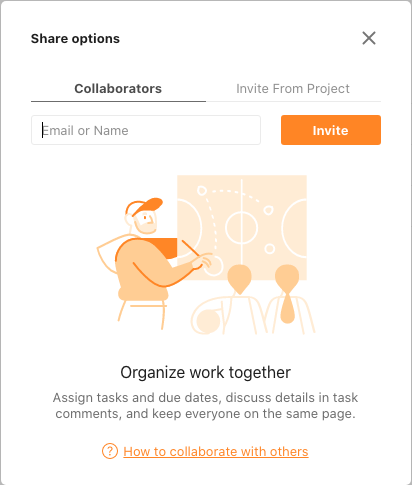
Project Share options
Enter the name of the person you want to invite to the project. If it’s someone you’ve never shared a project with in the past, you’ll need to type in the email address for their Todoist account. They’ll receive a project invite email, with the option to set up a free account if they don’t already have an account.
Click Invite to send the invitation. You can enter additional names and email addresses to invite others to this project, clicking the Invite button to send each one. When you’re finished adding people to the project, close the Share options window by clicking the X at the upper right.
The people you invited to the project will receive a notification in their Todoist:
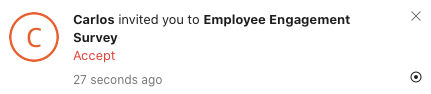
Project invitation
The notification includes a link to Accept the project. When the recipient clicks this link, the project will be added to the bottom of their project list. They can then drag the project to any position on their own list, or add it to their Favorites so it will be displayed above the other projects.
Assign Tasks
You can assign a task to a specific person in the project. When you open a task for editing, next to the Schedule field there is an Assign To button. If the task is not open for editing, move the mouse over the task to bring up some icons on the right. The Assign a person icon will let you assign this task to yourself, or anyone else in the project. When a task is assigned, the assignee will receive a notification in Todoist.
Comments and Attachments
When someone adds a comment to the project, by default a notification will be sent to all members of that project. When you enter the comment, you can change it to notify only certain members if appropriate. Even without notifications, the comment is still attached to the project so anyone on the team can read it.
A comment can also include attachments. On the Add Comment screen, you can type a comment and click the paper clip icon to upload a file. This brings up a window where you can drag and drop a file, or select a file on your computer, from Dropbox, or from Google Drive.
You can also add a voice comment by clicking the microphone icon in the Add Comment window. The first time you do this, Todoist will request access to your microphone. Then you can click Record to start recording, and speak into your microphone. When you finish talking, click Stop.
You then have the options to Retake the recording, Play the recording so you can hear how it sounds, and Attach the recording to the comment when you’re satisfied.
There’s also an icon that will let you add emojis in the comment, if you are so inclined.
Once you’ve entered your comment, uploaded an attachment, or recorded a voice message, click the Add Comment button to save your new comment with the task.
When a comment is added to a task, everyone in the project will receive a notification. (You can adjust this in Settings > Notifications if you don’t want to receive so many notifications.)
Keep Everything in Todoist
Since all project and task comments are stored here in Todoist, this means that you can keep all communication about this project stored right here within the project. You’ll never need to go digging through your emails to find what others have written in the past, or to find attachments related to this project.
One Minute Project Manager (1MPM)
(Note that Michael Linenberger has a video course teaching the 1MPM approach he developed. Here I’ll show you a quick intro on how to implement this in Todoist, but I suggest that you check out the full course. I found it quite helpful to review the course again before I worked out this approach in Todoist. I’ll put a link to the course at the end of this article.)
You may be working on large projects with multiple people, many moving parts, and dependencies. For projects like that, a dedicated project management tool like Microsoft Project is the best way to track everything.
But you may also have small projects, part-time projects that you are working in the background. These projects are often waiting on other people, or on your own time to become available. For these reasons, these projects often pause for days or weeks at a time. It’s easy to lose track of these projects because of the pauses, and standard project management tools may not work well for these projects.
Background projects typically have about 5 to 20 tasks, and few interdependencies. They also usually have no staff dedicated full-time to the project. These are projects that you (and perhaps a few other people) are working on between your other duties.
The One-Minute Project Manager (1MPM) approach is ideal for projects like this. And whether you are working the project alone or with others, Todoist is an excellent tool for tracking the project. Todoist will allow you to track the overall project plan and progress, and feed tasks to your MYN list (or the lists of other people) as appropriate.
The 1MPM system is based on principles similar to the One-Minute To-Do list approach. In both cases, we’re using urgency zones to identify how to prioritize your tasks. But 1MPM uses a larger planning timeframe.
A quick review: 1MTD has three urgency zones;
- Critical Now: Must do today
- Opportunity Now: do in 1 to 10 days
- Over the Horizon: can wait beyond 10 days
In 1MPM, project tasks are prioritized in these urgency zones:
- Critical This Week: tasks that must be completed this week
- Opportunity This Week: tasks available to work on, that do not have to be completed this week
- Over the Horizon or Brainstormed Tasks: initial list of all tasks needed to complete the project
When you start a background project, create the project in Todoist. If others will also be working on the project, you can immediately invite them to the project. The others could be your co-workers, your spouse, roommates — anyone who is working with you to accomplish this goal.
Create Sections for the Urgency Zones
Create three sections in the project:
- CRITICAL THIS WEEK
- OPPORTUNITY THIS WEEK
- BRAINSTORMED TASKS (or OVER THE HORIZON)
Start by brainstorming as many tasks as you can think of to accomplish the project, and enter the tasks in the BRAINSTORMED TASKS section. If you have invited others into the project, they can add tasks as well.
It may help to create a mind map to brainstorm the tasks. A mind map helps to open up your thinking process to identify all the components of a project. The visual representation of a mind map lets you see all the pieces in one picture, and you can jump between major sections as you think of more items for each one.
Once you’ve come up with the tasks needed, enter them into the Todoist project under the BRAINSTORMED TASKS section.
1MPM Process
Each background project should be reviewed every week — regular reviews on Monday are a good practice. The Monday planning session is what really makes 1MPM work for you.
It will usually only take a minute or two per project, which is why this is called the One-Minute Project Manager. You just need to glance through the list and make some quick decisions.
Step 1: Confirm that Critical Items from last week were completed and mark them as complete.
Step 2: Chase down any incomplete tasks. If others are involved in the project, they may be meeting with you during the review (in person, by phone, by video call, etc.) and can explain what’s going on so you can update the task.
Step 3: Review the tasks in the OPPORTUNITY THIS WEEK section. Is it time to move some of these tasks to the CRITICAL THIS WEEK section? You can re-prioritize tasks by dragging them up within their current section, or dragging them to a different section.
Step 4: Look at the BRAINSTORMED TASKS section — is it time to promote some tasks from there? If so, drag the tasks up to the OPPORTUNITY or CRITICAL section.
Step 5: Move tasks onto someone’s daily to-do list.
Move Tasks to Daily To-Do Lists
When you put a task onto someone’s to-do list, keep in mind the way MYN works in Todoist. The Todoist Due Date is the MYN Start Date — this is when the task will first show up on the Today list in Todoist. If there is a hard deadline, it should be typed into the subject of the task. For example:
DUE THURSDAY Decide on survey format
(Todoist may grab the “DUE THURSDAY” text and convert that to a Todoist Due Date, which is not what you want here. See the Automatic Date Recognition section below for more info on how to work with this, or avoid it completely if you prefer.)
Set the task priority according to its MYN urgency: P1 for Critical Now, meaning it must be completed today. Most tasks should be moved to your to-do list as P2, so that you have time to plan this task along with the other things you have to get done.
If others are working in the project, assign the task to that person in Todoist. This includes specifically assigning tasks to yourself, so that anyone looking at the project in their Todoist can see who has responsibility for each item on the list. If you are the only one working on this project, you don’t need to bother with this. In fact, Todoist does not offer the option of assigning tasks in projects that are not shared.
Assigning Tasks to Others
Move a task to someone else’s to-do list by assigning the task to that person, and setting the Due Date and Priority. The task will appear on their Today list on the assigned Due Date.
Since everyone working on this background project probably has other duties as well, don’t spring Critical tasks on them at the last minute. The weekly planning session gives you a chance to figure out when someone needs to start working on the various tasks.
For example, suppose you see a task in the OPPORTUNITY THIS WEEK list that needs to be completed by Thursday next week, and you’re going to have Carlos handle this task. Go ahead and assign the task to him, with the actual due date typed into the title. Even if Carlos isn’t in the review meeting when you make this assignment, he will receive notifications of this task in Todoist and by email.
Since the task doesn’t have to be finished today, set the Priority to P2. I suggest setting the Due Date to Today when you make the assignment. This will put the task at the top of the Opportunity Now section in his Today list. When he reviews his Today list, he can consider the task and read through any comments and attachments that have been added. He can then update the Todoist Due Date to the day he wants to actually start working on the task.
Regular weekly reviews will help you keep ahead of the project tasks. Promote the tasks from BRAINSTORMED to OPPORTUNITY or CRITICAL as appropriate. By the time a task is moved to CRITICAL THIS WEEK, it should be on someone’s list with a Priority and a Due Date. But you don’t have to wait until a task is on the CRITICAL THIS WEEK list. You can set the Priority, Date and Assignment at any time. By doing this, the tasks in this project will be part of the MYN reviews of all team members, as well as the weekly 1MPM reviews.
Automatic Date Recognition
By default, Todoist will automatically recognize when you type a date into a task title. For example, think about a task with a deadline of February 13, and you want to start working on it February 8.
When you enter the task:
DUE Feb 13 Submit draft of proposal
Todoist will grab the phrase “DUE Feb 13” and set that as the Due Date, removing it from the task title. This is not what you wanted.
Todoist does let you know it’s going to do this — as soon as you type DUE Feb 13, it will highlight the phrase to show that it has recognized the Due Date. You can undo this by clicking or tapping the highlighted text. The highlight will be removed, and now that task does not have a Due Date set.
You can also override this by entering a second date. In our example above, we want the task to appear on our Today list on February 8, so that’s what we want to use as the Todoist Due Date. You can type the task like this:
DUE Feb 13 Submit draft of proposal Feb 8
As you type, Todoist will highlight the phrase “DUE Feb 13.” But then when you continue typing and enter Feb 8, the first highlight will disappear and the second date you typed will be highlighted. That will now be taken as your Todoist Due Date, which will be your MYN Start Date.
If you find this automatic date recognition to be annoying, you can go into the Settings, on the General tab, and turn it off.
Email Into Todoist
Like most task managers, Todoist provides an email address you can use to email tasks directly into Todoist. However, while most apps only allow you to email new tasks to the Inbox, Todoist gives you a way to email tasks to any project.
To get the email address for adding tasks to a project (for this purpose, the Inbox is also considered a project), select the project and click the three-dot icon. Click the choice labeled Email tasks to this project. This will open a window titled Add tasks via email. Near the top it will show the email address for your Inbox, with a Copy to clipboard link. Click the link to copy the email address, and add it to your contacts. You can use the same steps to get the email address for any project in your list.
Additional information about emailing tasks is listed below the address, though the information listed in this window is not complete.
Email Format
The subject of the email will be the title of the task, and the body of the email will added as a comment. If the email has an attachment, that will also be stored as a comment. You can set the Todoist Due date by including the word “date” in angle brackets, along with the date. The date can be specific (3/15/21) or relative (next Tuesday). Here are some examples of dates you can write:
- <date today>
- <date tomorrow>
- <date March 4>
- <date 4/11/21>
- <date next monday>
You can set the priority of the task by typing it into the email subject: p1, p2, etc. If the project is shared, you can also assign it to someone by writing their Todoist name with a plus sign (+).
For example, let’s say you want to add a task to the Employee Engagement Survey project. The task is “Review survey questions.” We’re going to assign it to Carlos, and we want to put it on his list this coming Monday, and it needs to be finished by the Friday of that week (so we’ll write that at the beginning of the subject line). That means it will be a Priority 2, Opportunity Now task for him. We can assign the task by sending an email to the project with this subject:
DUE FRIDAY Review survey questions <date mon> p2 +Carlos
The date, priority and assignment will be recognized and removed, so the task will be saved as “DUE FRIDAY Review survey questions” — with the Todoist Due Date set to the following Monday, a Priority of 2, and assigned to Carlos.
Send Emails to Tasks
Todoist goes even further with email — you can email comments to a specific task. To get the email address, click on a task to open it for editing. With the task open, click the three-dot More task actions icon, then choose Add comments via email. A window will open with the task email, and a Copy to clipboard link. Click the link to copy the email address, then add it to your contacts.
Emails sent to this address will be added to the task as comments. If the email includes an attachment, that also will be added to the task.
More Info
Todoist is a very rich program, offering considerable power to anyone who will take the time to learn. I’ve written enough here to help you get started with 1MTD, MYN and 1MPM, but there is much more you can do with it once you have your MYN system set up.
Todoist has robust help system on their website. You can go to todoist.com/help, or click the Question Mark icon at the upper right in your Todoist screen and choose Help. They also have an active blog at blog.doist.com, or you can click the Question Mark and choose Blog.
Todoist has a YouTube channel at youtube.com/c/todoist. If you type “todoist” into the Search field on YouTube, you will find hundreds of videos of people talking about Todoist, and explaining how they are using the program. You can also narrow the search by including specific topics, for example “todoist templates.”
If there is interest, I can write additional articles for this blog about ways to use Todoist. Let me know in the comments below if you have any questions, and if you’d like to see more articles about Todoist.
Training by Michael Linenberger
I’ve given you enough information here to get started with using Todoist for 1MTD, MYN, and 1MPM. I suggest that you also look into the other material offered on Michael Linenberger’s website (links below). I’ve really learned a lot, and made considerable improvements to my productivity (as well as lowering my stress level), by taking Michael’s video courses and reading his books.
1MTD vs MYN (with free 1MTD ebook)
MYN book: Master Your Workday Now
Well done and thank you!
I’ve been looking for a Toodledo alternative for about a year. I had tried Todoist, but didn’t care for it. Looks like it’s worth another look. Thanks for the detailed post.
I’ll definitely re-evaluate Todoist. Do you know if it’s possible to keep entire emails as part of the task? My most successful implementation of MYN was when I could use the Outlook task list, and attach multiple emails to a single Task to complete. I saw that you can create a task “write the report” using email, but that’s not exactly the same as having a “write report” task that also has the inputs from five colleagues, three unconnected thoughts and requests from my boss, etc…all the emails I need to reference in order to complete that task. Thanks for any ideas!! Great article.
You can attach multiple emails to any task. Click a task to open it for editing, then click the three-dot “More task actions” menu and click “Add comments via email.” This will open a window with the email address, and a link to copy the email address to the clipboard.
Emails sent to that address (including attachments) will be saved under the task.
EXCELLENT INFORMATION. JUST AT THE RIGHT TIME TOO. PLANNING SEASON!
To dip my toes into the waters of MYN task apps, I’ve begun using Todoist as my main app, and I’m rather pleased with it so far. As a result, I’ve been thinking of making a comprehensive MYN video course on it, much as I did for Windows Outlook and the programme Toodledo.
Thanks for posting this very informative article. I too have found Michael’s MYN and 1MPM to be absolute changers for my productivity and in reducing my stress levels! I use Outlook 365 exclusively at the moment.
Looks interesting. Is there a way to transfer all my existing Outlook tasks over to ToDoist? OR to keep them in sync between ToDoist and Outlook?
As far as I can tell, there is no way to sync Outlook tasks with Todoist.
Todoist can import a CSV file, so you should be able to bring Outlook tasks into Todoist if Outlook can export your tasks to CSV. (I don’t have Outlook, so I can’t confirm that side of the answer.)
I found this article on the Todoist Help site about formatting a CSV file for import:
https://todoist.com/help/articles/how-to-format-your-csv-file-so-you-can-import-it-into-todoist
If Outlook can export CSV, it’s not going to be in a format that Todoist can accept. But you can open the CSV in Excel, and set up the columns in the way that Todoist wants to see it. You may need to do other edits, as well. Then save it again as CSV, and do the import.
I have seen some imports go horribly wrong. (Not in Todoist, but in other databases I’ve worked with or supported.) So if you do try this process, I’d suggest that you first save a subset of your CSV, like 3-5 rows, and import that. Then look at your Todoist, to see if that worked as expected. If yes, then do the full import. If not, correct the CSV file and try another test.
I’ve used Todoist Premium for a couple of years, and I’ve let it when I met Michael’s MYN. But I never likes Outlook, and finally, this year I’ve taked the painful decision to let MYN back and transfer hundreds of tasks to Todoist again.
Now, this excellent post brings me the chance to take the best from both worlds. I’ll face 2021 with new hope and the best tools in my hands. Thank you both very much!
One drawback i found is that it is not possible to assign a start date (=due date) in the past, in order move the task down the list. But a workaround seems to be to assign an early time in the due date, or do you know of a better way?
Right, you can’t assign a date in past using the date picker (clicking on calendar icons), but you can *type* the old date in at the top using the keyboard. Not as convenient, but doable.
ah thanks! when i tried this first i changed from 8 Jan to 7 Jan, but this assings the due date 7 Jan 2022! But changing it to 7 Jan 2021 works! MYN seems to work pretty good with todoist 🙂
Thank you for this terrific article! There’s a lot to like in Todoist and I’m gradually switching over to it from Toodledo. I really hope that Michael will do a full MYN video course for Todoist as I found his video course for Toodledo very helpful.
This is pretty similar to Carl Pullein’s Time Sector system he has switched to on his YouTube channel (under his name, but most of his videos are under the “Working with Todoist” heading, since that’s always been his main focus on the channel. 1-2 years ago, pre-pandemic, he realized that switching AWAY from putting tasks under Projects and assigning them instead to “Projects” called “THIS WEEK,” “NEXT WEEK,” and “LATER” (or maybe next month/quarter… don’t remember), he says this is SO MUCH easier for him, and it shortens his evening review and weekly review time dramatically.
Though in this system, he still prefers to have P2 & P3 separate his tasks out into morning/midday & afternoon/evening tasks, respectively, to help him order things when he looks at his usually 10 tasks maximum for the day.
He doesn’t assign dates AT ALL unless they’re vital–like meetings/appointments. That’s one of the most liberating things about his new Todoist layout.
Yes, Carl Pullein publishes a lot of good information about Todoist. When he first published his Time Sector system, Todoist still could not do custom sorting, and this was the closest that Todoist could come to MYN.
I was trying out Carl’s Time Sector system when Todoist implemented custom sorting. Once I could do true MYN in Todoist, I immediately jumped on that. That is what works best for me.
If the Time Sector system is what works best for keeping your personal productivity on track, then of course you should stick with that.
I forgot to add that on top of “THIS WEEK” and “NEXT WEEK” etc he has a “project” called “GOLDEN TEN” which are THE tasks he most wants to tackle/achieve that day. When creating his golden ten list from items in his “THIS WEEK” folder at the end of each day for the next day, he gives his top priority tasks, which he tries to limit to two items, the p1 label gets added to those, and that’s it.
@Charles Olsen, Thank you, sir!
This is a very nice article, which is swaying me to give Todoist a shot.
@Christian Elliott, I’m in the same boat. I simply have a hard time trusting Toodledo is in it for the long haul anymore. My responsibilities have grown, and am no longer sitting at a desk the majority of the time to keep up with MYN in the Outlook desktop version. I’ve decided to try this as a starting point. I too, would love for a video package Todoist specific from Mr. Linenberger! As I have purchased all but the Google tasks in the past.
Jeff, thanks for the comment!
I started MYN with Michael’s video course about Toodledo. But I agree with you now about Toodledo — I don’t know if they’re going to be around much longer.
I really like the Doist company and their philosophy. And Todoist is a powerful system for individuals or teams.
You mentioned that your responsibilities have grown. If you are working with a team, Todoist’s project sharing combined with Michael’s 1MPM approach provide a very effective system for managing background projects.
Nice write up, many thanks. I switched over to Todoist for MYN after trying this out – using Charles’ link. I have wanted to add Kanban board capability to my system – to provide an alternative view of things that need to be done. Also 1MPM projects fit in quite nicely using section headings.
This https://www.michaellinenberger.com/blog/guest-post-using-todoist-with-myn-and-1mtd-by-charles-olsen/#comments just helped me! Thank!
Charles and Everyone,
Is there a way to connect Todoist tasks setup in MYN format to be added to your calendar? I run my day from my calendar and if my tasks are not on my calendar there is a risk of shifting, plus it’s great to know visually how much time i need every day to get things done and when I’m officially done for the day…I don’t know if this makes sense to see Tasks and Calendar as two separate things. Let me know what you all think. There are too many productivity articles written in WSJ, Forbes, etc..that say if you don’t put your tasks in your calendar they will not get done or high risk of failure.
Dahyu,
You can integrate Todoist with some calendars, as discussed here:
https://macstore.todoist.com/help/articles/use-todoist-with-your-calendar
It works best with Google Calendar, but has some capability with other calendars.
Using this approach, tasks in Todoist with a Due Date will show up on your calendar as all-day events. Tasks with a due date and time will show up as one-hour blocks in your calendar.
I did experiment with this in the past, but didn’t like the way it made my calendar look so I quickly disconnected it. Also, it doesn’t give you an MYN view of your tasks.
I have seen writing suggesting that tasks should be on your calendar. David Allen writes that anything that must be done on a specific day, or specific day and time, should be on your calendar.
When I do have a task that must be done at a specific time, I do put that as an appointment on my calendar. Otherwise, I work from my Today view in Todoist. If you follow the MYN review practices, you will be aware of what needs to be done, and when. (Review Critical Now (Priority 1) every hour, review Opportunity Now (Priority 2) at the start of every day.)
Some calendars offer ways to display your appointments and events in different colors. If you want to stick with just your calendar, you could try using the colors to indicate the urgency level. For example, red could be Critical Now, blue for Opportunity Now, yellow for Over the Horizon, etc. Create the tasks as appointments if they need to be done at a specific time, or all-day events if they just need to be done on that day, and set the color as appropriate. This would let you use MYN completely with your calendar.
If I was using this approach, I would work strictly in the calendar and not do the extra work of also maintaining the lists in Todoist. You can play around with it both ways and see how you’d prefer to do it.
Charles, huge thanks, there is enough detail here for me to experiment with…simplicity = higher chance of consistency. I will try to use my calendar in a MYN way.
Sanchit, this is awesome! My daughter just moved into a small apartment, and we think she’d love this. Where can we buy them at jigsaw puzzle?
hope Michael will do a full MYN video course for Todoist as I found his video course for Toodledo very helpful.
Great article-thanks!
One minor challenge I found when setting this up, is that if I assigned a task to a project but did not add a due date (mainly due to past habit), the task dropped out of sight, at least until my next review.
To combat this I added a filter to my favorites called “Unprocessed” and set the query to “no date”. That provides a trigger for me to fully process my tasks.
One other quibble with Todoist is that I can’t move something up the p2 list by adding an earlier time. Sorting by due date does not seems to recognize due times.
Thanks again!
Charles, congratulations on being mentioned and credited in Michael’s Todoist MYN course! Well deserved. I purchased the Todoist MYN course as soon as I read the email. It’s fantastic. I’ve been piecing together my MYN system with Todoist since reading this post a little while ago. Truly wanting Michael’s insights and thoughts. Well, this course has it all, and then some! Cannot recommend it enough. Congrats Charles, and Thank You, Michael! Your courses and systems are second to none, sir!
Thanks, Jeff! I’ve been looking forward to seeing this video course since I wrote this article. Michael always manages to dig in and uncover fine points of the software that I’ve overlooked. The video course builds in a good progression, with plenty of helpful review along the way. I’ve been using Todoist for MYN for over six months, and I still learned some new things in these videos.
Nice explanation but one drawback that I noticed is that it is not possible to assign a start date for the past assignments.
Actually you can assign a date in the past. Can’t use the date picker but you can type the date in manually. Or type words like “yesterday” or “3 days ago”. Michael
One little snag I ran across while putting this up was that tasks that I assigned to projects but did not give a due date for (mostly out of habit) disappeared from view until I reviewed the backrooms again.
I totally agree with some of the reflections exposed. Congratulations on this particular publication and the rest of your development on the web since comprobar Euromillones
Your blog is a ray of sunshine on even the gloomiest of days. Thank you for brightening my life.
I have learned many new and interesting things from reading your post and hope you will post more interesting information in the near future.
Master Essential Skills:
To excel at Suika Game, you’ll need to master critical skills such as observation, quick reflexes, and calculation. Dedicate time to hone and perfect these skills to navigate through challenges and emerge victorious
I like the way you think and write about your points of view in this article
Players must gather resources, craft tools, and build shelters to navigate this sandbox world’s many biomes. Each environment has its own unique challenges, requiring players to adapt their strategies and think creatively. The ever-changing landscape of Miniblox keeps players on their toes, as new dangers and opportunities arise with every session. Crafting and exploration are key, and players must stay adaptable to survive in this dynamic world.
Thank you
Todoist sounds like a fantastic tool for staying organized and productive! Speaking of planning, finding well-equipped RV parks in Midland TX is a great way to ensure a hassle-free and comfortable travel experience. Have you explored any good options in the area?
Ragdoll Hit is available on multiple platforms, including web browsers, iOS, and Android devices. This accessibility ensures that you can enjoy the game anytime, anywhere.
Commitment to Innovation and Excellence
At Tekskills, we are passionate about pushing the boundaries of technology. Our best Artificial Intelligence service
is rooted in a culture of innovation and continuous improvement. We endeavor to practice high levels of specialist learning such that our clients receive the most up-to-date AI solutions that improve their functionality. Partner with us to experience unparalleled expertise and a commitment to your success.
Traffic Jam 3D is a game where you have to drive your car through busy streets without hitting any other cars and complete all the tasks to get to the finish line as quickly as possible.
This is terrific information; I will inform my acquaintances and encourage them to investigate it. I am grateful for your willingness to share. When you have additional time, please visit: foodle
I have bought leather shoes from this brand before and found the “Three Guarantees” policy quite clear, which made me feel secure when using them. Even if the shoes had some problems, they supported quick repairs, just like when I played Drift Boss , even if I failed to drift a few times, I still had the chance to do it again and overcome the challenge!
I have bought leather shoes from this brand before and found the “Three Guarantees” policy quite clear, which made me feel secure when using them. Even if the shoes had some problems, they supported quick repairs, just like when I played Drift Boss , even if I failed to drift a few times, I still had the chance to do it again and overcome the challenge!
Wow, this is the guide I’ve been waiting for! I’ve been a long-time MYN user and a recent Todoist convert, and I’ve been struggling to make them play nicely. Charles, you’ve cracked the code! This is incredibly helpful and clearly laid out. Thank you so much! When you need to reduce stress, you can play drive mad game.
Interesting approach, but I’m curious if this setup might add too much overhead for someone already overwhelmed. Doesn’t all this tagging and system configuration defeat the ‘one-minute’ simplicity of 1MTD? I find myself losing time to system management rather than task execution sometimes By the way,When you need to reduce stress, you can play doodle baseball.
As a seasoned MYN practitioner, I can attest that mapping the urgency zones into Todoist projects/filters as Charles suggests is the most effective way. I personally use a ‘Today’ filter combined with labels for ‘Critical Now’ and ‘Opportunity Now’ tasks. Great to see this detailed walkthrough for others! Finally, recommend a stress-relieving Drift Boss game.
I’m just getting into productivity systems, and this combination of MYN/1MTD with Todoist sounds powerful. I’m excited to try implementing this. Any quick tips for someone just starting out with both the methodology and the app? It seems like a lot to learn at once! By the way, try Ragdoll Archers Game for super fun archery gameplay when you want to relax!
Finally, a way to tame my digital to-do beast! My Todoist inbox is usually a chaotic abyss, but this MYN/1MTD structure might just bring some order to the force. Now if only it could do my tasks for me too… A man can dream! Need a cool name? Name Generator serves up unique suggestions for any theme in seconds!
Scoring in Golf Orbit is both quick and fun, and it feels like you’re making unique golf shots in a bright area. It’s a truly unforgettable gaming experience.
This article came at the perfect time! I’ve been looking for a way to perfectly combine Todoist and 1MTD. The author’s tips are super practical and solved a lot of my confusion. I feel much more confident about managing my to-do list now. Can’t wait to try it out!If you want to take a break, come to this football bros.
This article came at the perfect time! I’ve been looking for a way to perfectly combine Todoist and 1MTD. The author’s tips are super practical and solved a lot of my confusion. I feel much more confident about managing my to-do list now. Can’t wait to try it out!If you want to take a break, come to this football bros.
BASEBALL 9 is an exciting, realistic sports game about baseball. Become a manager of a professional baseball team and lead your team to victory, participating in higher tournaments.
Six Game Box is a new platform in Pakistan for gaming and online earning. It offers players a chance to win a lot of prizes and rewards.
The icon with the arrows pointing down and up let you specify custom grouping and sorting
Thanks for the detailed post, Charles! I’ve been using Todoist for task management, and the way you’ve integrated MYN and 1MTD into the app is a game-changer. It’s amazing how flexible Todoist can be for different productivity strategies. I recently came across a tool called kirka.io unblocked that helps me stay focused and motivated while working on my tasks, especially when I need a quick break from work. Anyone else using gaming apps like this to balance work and play?
Very detail, thanks for sharing